Install the Akamai EdgeWorker Enforcer
If your organization uses Akamai, you can use HUMAN’s Akamai EdgeWorker Enforcer to protect against malicious behavior. The Enforcer is installed using an Akamai EdgeWorker and deployed to your content delivery network (CDN). The Enforcer dictates how traffic should be handled per your organization’s standards.
You can learn how to install the Akamai EdgeWorker Enforcer with this article.
If your organization uses Akamai ESI, then the Enforcer installation process is slightly different. You can reference this information in our help article.
Prerequisites
- An Akamai account with editor access to the following:
- NetStorage services
- EdgeWorkers
- Property Manager
- A zip file from HUMAN containing the following files. Reach out to contact-support@humansecurity.com if you do not have these:
- c.js
- A tgz file
- Your unique HUMAN information:
- Your Application ID. You can find this under Platform Settings > Applications > Select an application > Application Settings > Application ID in the HUMAN console. If you have multiple environments, you will also have multiple Application IDs, so be sure to choose the correct ID for the environment you want to install on.
- Your Server Token. You can find this under Platform Settings > Applications > Select an application > Application Settings > Server Token.
- Your Risk Cookie Key. You can find this under Bot Defender > Policies > Policy Settings > Policy Information.
Installation
The Akamai installation consists of three parts. Be sure to complete each part in order.
NetStorage creation
-
From your Akamai account’s main menu, navigate to Origin Services > NetStorage > Storage Groups.
-
Select + Add Storage Group.
-
Complete the steps that appear to create your storage group. You can update fields as appropriate for your organization or leave them as their defaults. However, note the following exceptions:
- Storage Group Details > Access Control Group: Select the same group as the Property Manager that you will be editing for this setup.
- Directory Settings: When creating a directory, we recommend naming it px.
If you do not name the directory px, then you will need to update all related rules matching this NetStorage path in the Property Manager with the different directory name that you chose.
- Select Create. The storage group will begin to propagate.
- Once the group has propagated, navigate to NetStorage > Upload Accounts.
- Either upload a new user or edit an existing one. Ensure the user has the following settings:
- Access Methods > NetStorage HTTP CMS API: Select + Add HTTP API key and Save.
- Access Methods > File Manager: Toggle on Enable File Manager Access.
- Upload directory association: Select the directory you created in Step 3.
- Upload directory association > Access: Ensure the user has read and write access.
- Create or Save your account.
- Navigate back to NetStorage > Storage Groups.
- Select the group you created in Step 3. Then, select File Manager.
- Select the px directory you created in Step 3.
- Select Upload and upload the c.js file provided by HUMAN.
Once you’ve uploaded your file, you’re ready to move on to EdgeWorker creation.
EdgeWorker creation
-
From your Akamai account’s main menu, navigate to CDN > EdgeWorkers.
-
Select Create EdgeWorker ID.
-
Complete the following fields:
- Name: Enter a name for your EdgeWorker.
- Group: Select the same group as the Property Manager that you will be editing for this setup.
- Resource tier: Select Dynamic Compute.
-
Select Create EdgeWorker ID.
-
Select the ID of the EdgeWorker you just created.
-
Select Create Version.
-
Upload the tgz file provided by HUMAN and select Create version.
-
From the Actions menu, select Activate version.
-
Choose whether to activate it on your staging or production network.
We recommend activating on both staging and production. This way, when your Property Manager setup is complete, you can freely activate the configuration to either staging or production without going back to your EdgeWorker later.
If you do choose to activate on both, then you will need to do Steps 8 and 9 twice: once for each network.
Once your EdgeWorker is activated, you’re ready to move on to Property Manager setup.
Property Manager setup
There are two ways to set up your Property Manager:
- HUMAN setup (recommended): Grant HUMAN access to your Property Manager so we can make the required changes for you.
- Manual setup: Configure the Property Manager yourself with the provided variables and rules.
HUMAN setup
We recommend letting HUMAN set up your Property Manager due to the manual nature of the process. This requires creating and sharing an API token with our team so we can access your Property Manager.
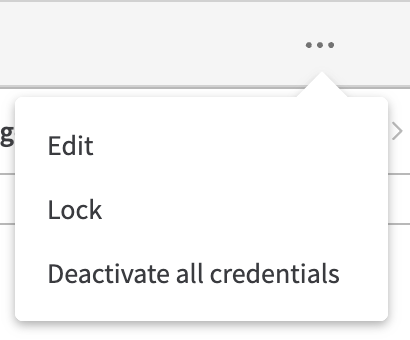
HUMAN will never access your account or configuration without your permission. In addition, you can pause or revoke Akamai API credentials access at any time, so you will always have the ability to control when our team can use your API credentials. You can do this from Account Admin > Identity & Access > Actions menu for the client.
Lock: Disables the client until you unlock it. If you anticipate that HUMAN will need to access your Property Manager again in the future, you can choose this option.
Deactivate all credentials: Permanently delete the client. This means the API will no longer be active and will not work for anyone even if HUMAN has the credentials.
To create credentials:
- Navigate to Account Admin > Identity & Access.
- Select Create API Client.
- Under Users and API Clients, select the type of API client type to create, then select Advanced. If you’re not sure, you can create one for Myself > Advanced.
- Complete the fields as appropriate for your organization. If you’re not sure, then you can leave the fields as their defaults.
- Select Create API Client.
- Copy the credential information that appears and paste it in a safe place for later. This information will be hidden after you leave the page, so be sure you save it before you move on to the next step.

- Contact HUMAN with a request to share your credential information from the previous step so we can arrange a secure way for you to send it to us. Do not send your information directly without confirming with us.
Once you’ve provided HUMAN with your Akamai token, we will configure the necessary parameters and rules for your Enforcer. After that’s complete, you can deploy the Enforcer at any time with the following:
- From your Akamai account’s main menu, navigate to CDN > Properties.
- Select the Property Name of the Property Manager that HUMAN set up.
- Select Open Version #, where the # is the latest version number of the Property Manager.
- Select the Activate tab.
- Choose the network you would like to activate on and select Activate. We recommend activating on your Staging network first for testing purposes.
- If you choose to deploy to Staging, then confirm that the Enforcer is working properly, then Activate on Production.
Your Akamai Enforcer has been successfully installed with the minimum requirements to monitor activity on your CDN. You can further customize the Enforcer’s behavior by referencing our configuration options.
Once you finish installing, be sure to contact HUMAN to complete your tuning process.
Manual setup
If you opt not to have HUMAN set up your Akamai Property Manager, then you will need to provide all the necessary properties and rules yourself. You can learn what you need to include from the parameters listed below.
- From your Akamai account’s main menu, navigate to CDN > Properties.
- Select the property name that you want to deploy the Enforcer on.
- Select New Version.
- Add Property Variables and Property Configuration Settings Rules as described below.
Property Variables
You can add new property variables by selecting Property Variables > + Variables. You must include all these variables.
Property Configuration Settings Rules
You can add new property rules by selecting Property Configuration Settings > + Rules. You must include all the following rules.
Property manager rules should be created in the following hierarchy:

- PXEnforcerRule
- PXBypassResponseProviderRule
- PXSetCIBypassResponseProviderRule
- PXSetGraphqlBypassResponseProviderRule
- PXWorkerRule
- PXStaticContentWorkerRule
- PXBlockRule
- PXSapiRule
- PXFirstPartyClientRule
- PXFirstPartyCaptchaRule
- PXNoCacheRule
- PXFirstPartyXHRRule
- PXTelemetryRule
- PXActivitiesRule
- PXRiskApiRule
- PXResponseRule
- PXSetResponseProviderErrorRule
- PXEdgeworkerFailureRule
- PXBypassResponseProviderRule
You can learn how to create each rule below. Click each heading to open it.
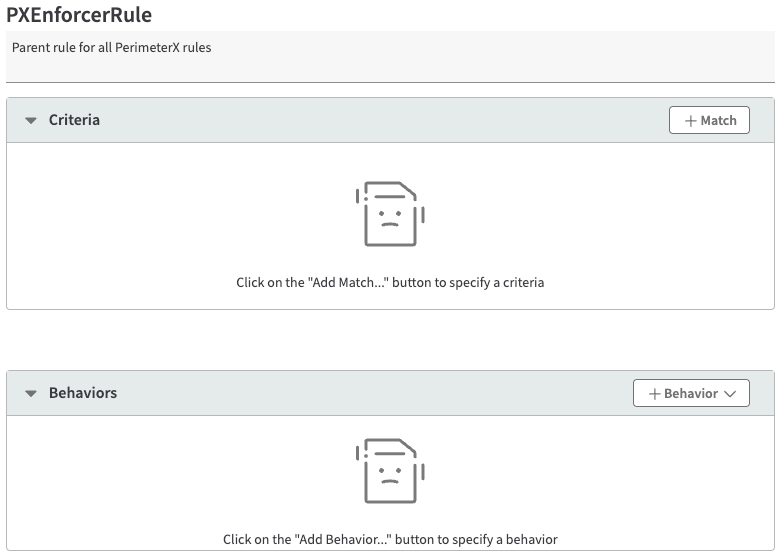
PXEnforcerRule
This is the parent rule for all the following rules.
- Select + Rules.
- Select the Blank Rule Template and enter PXEnforcerRule as the rule name.
- Select Insert Rule.
PXBypassResponseProviderRule
This rule sets the bypass response provider variable in case you need to access the request body. It also should have the following rules nested inside it:
- PXSetCIBypassResponseProviderRule
- PXSetGraphqlBypassResponseProviderRule
To create this rule:
-
Select the PXEnforcerRule you created earlier. This will nest PXBypassResponseProviderRule inside when you create it.
-
Select + Rules.
-
Select the Blank Rule Template and enter PXBypassResponseProviderRule as the rule name.
-
Select Insert Rule.
-
In the Criteria section, select + Match.
-
Add the following criteria:
- Criteria: Request Method
- Result: is not
- Value: GET
-
Select Save.

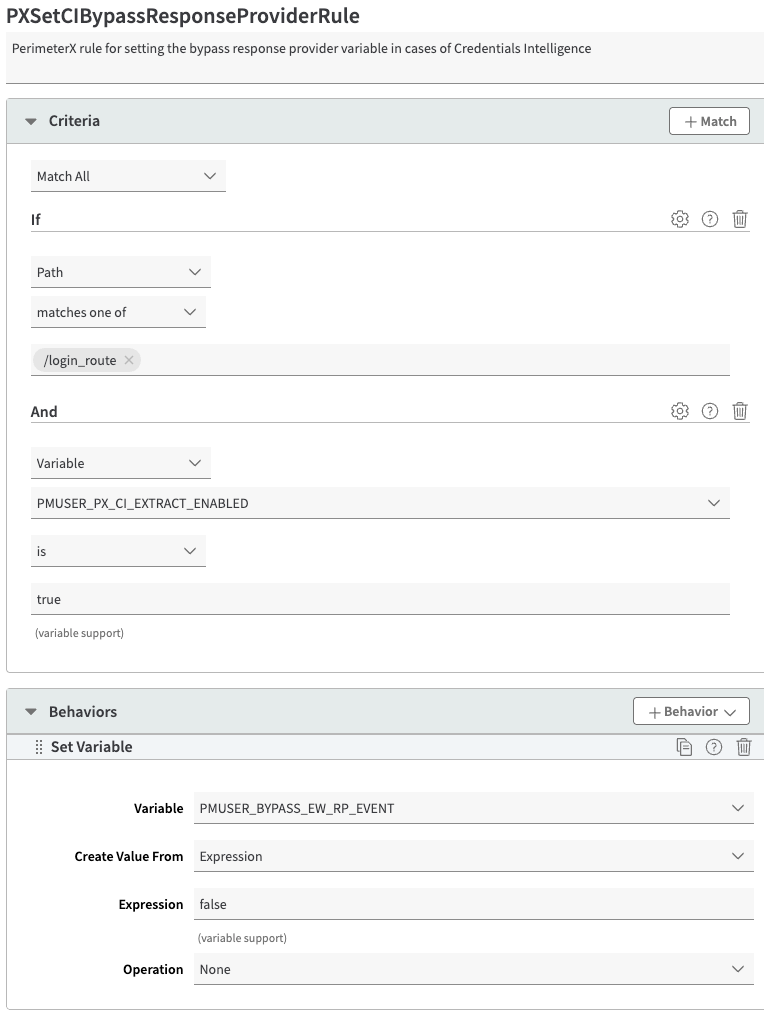
PXSetCIBypassResponseProviderRule
This rule sets the bypass response provider variable for Credential Intelligence. To create this rule:
-
Select the PXBypassResponseProviderRule you created earlier. This will nest PXSetCIBypassResponseProviderRule inside when you create it.
-
Select + Rules.
-
Select the Blank Rule Template and enter PXSetCIBypassResponseProviderRule as the rule name.
-
Select Insert Rule.
-
In the Criteria section, you will create two criteria. Select + Match and add the following:
- First criteria:
- Criteria: Path
- Result: matches one of
- URL:
/login_route
- Second criteria:
- Criteria: Variable
- Property Variable: PMUSER_PX_CI_EXTRACT_ENABLED
- Operator: is
- Operand: true
- First criteria:
-
In the Behaviors section, select + Behavior > Standard Property Behavior.
-
Select Set Variable, then select Insert Behavior.
-
Complete the following fields:
- Variable: PMUSER_BYPASS_EW_RP_EVENT
- Create Value From: Expression
- Expression: false
- Operation: None
-
Select Save.
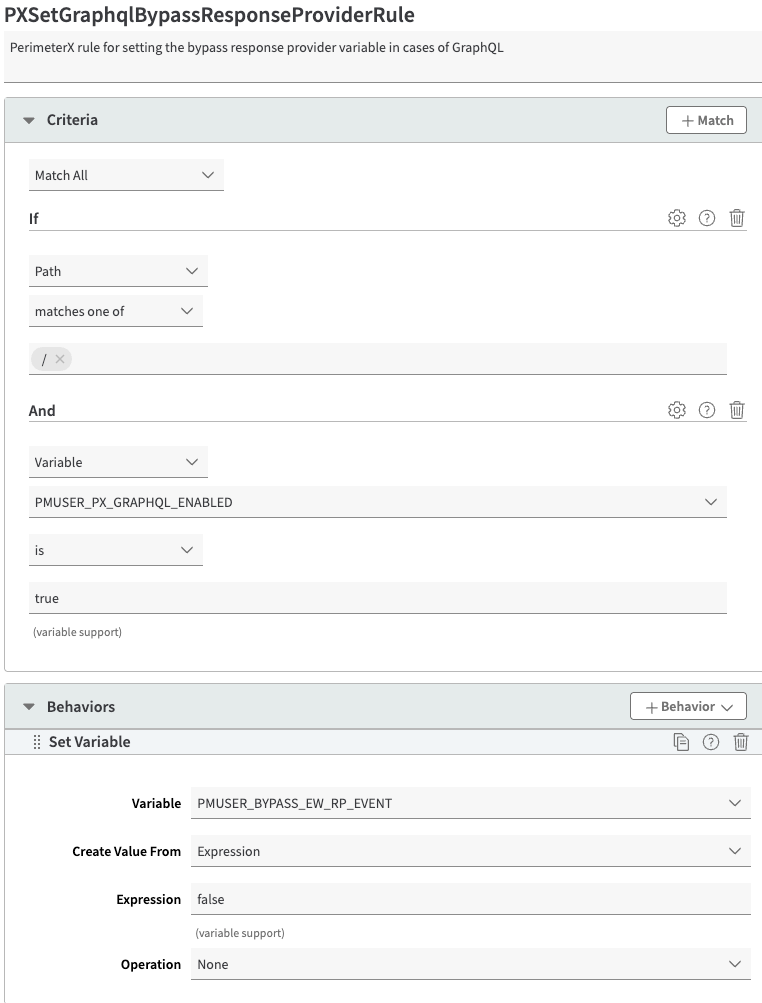
PXSetGraphqlBypassResponseProviderRule
This rule sets the bypass response provider variable in cases of GraphQL. To create this rule:
-
Select the PXBypassResponseProviderRule you created earlier. This will nest PXSetGraphqlBypassResponseProviderRule inside when you create it.
-
Select + Rules.
-
Select the Blank Rule Template and enter PXSetGraphqlBypassResponseProviderRule as the rule name.
-
Select Insert Rule.
-
In the Criteria section, you will create two criteria. Select + Match and add the following:
- First criteria:
- Criteria: Path
- Result: matches one of
- URL:
/
- Second criteria:
- Criteria: Variable
- Property Variable: PMUSER_PX_GRAPHQL_ENABLED
- Operator: is
- Operand: true
- First criteria:
-
In the Behaviors section, select + Behavior > Standard Property Behavior.
-
Select Set Variable, then select Insert Behavior.
-
Complete the following fields:
- Variable: PMUSER_BYPASS_EW_RP_EVENT
- Create Value From: Expression
- Expression: false
- Operation: None
-
Select Save.
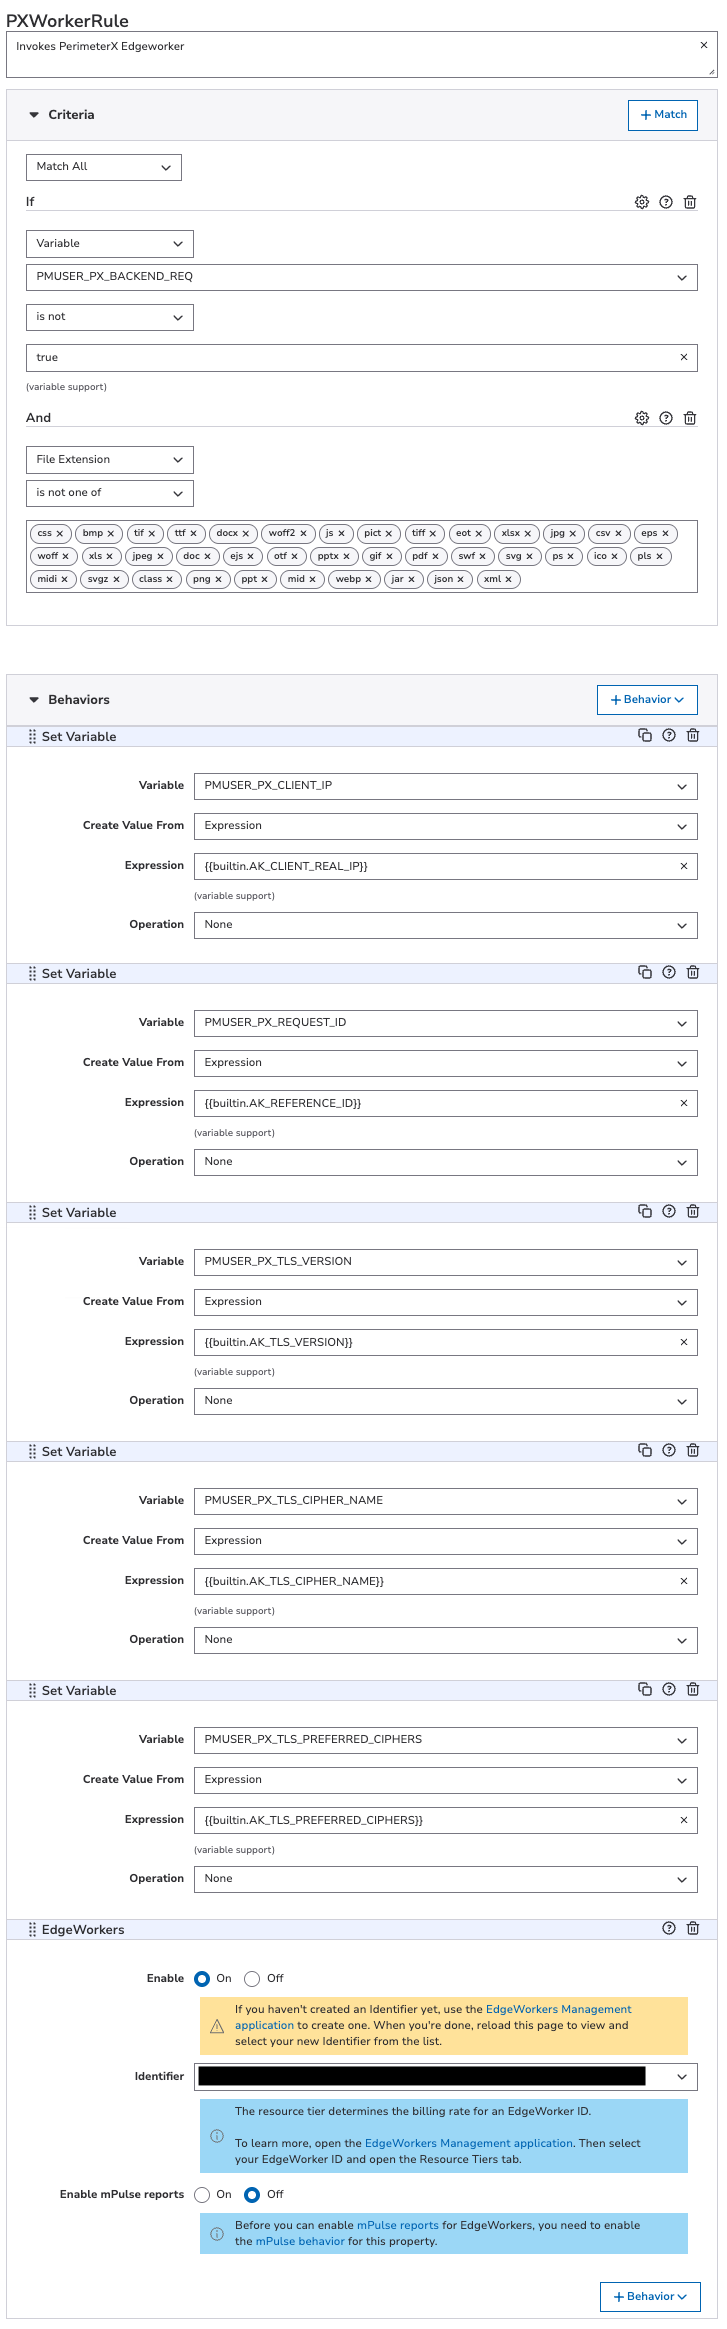
PXWorkerRule
This rule sets the bypass response provider variable in case you need to access the request body. To create this rule:
-
Select the PXEnforcerRule you created earlier. This will nest PXWorkerRule inside when you create it.
-
Select + Rules.
-
Select the Blank Rule Template and enter PXWorkerRule as the rule name.
-
Select Insert Rule.
-
In the Criteria section, you will create three criteria. Select + Match and add the following:
- First criteria (be sure to replace
app-id-without-pxwith your Application ID without PX in front of it):- Criteria: Path
- Result: does not match one of
- URLs:
/pxns/*,/app-id-without-px/init.js,/app-id-without-px/captcha/*,/app-id-without-px/xhr/*
- Second criteria:
- Criteria: Request method
- Operator: is not
- Value: OPTIONS
- Third criteria:
- Criteria: File Extension
- Operator: is not one of
- Extensions: css, bmp, tif, ttf, docx, woff2, js, pct, tiff, eot, xlsx, jpg, csv, eps, soff, xls, jpeg, doc, ejs, otf, pptx, gif, pdf, swf, svg, ps, ico, pls, midi, svgz, class, png, ppt, mid, webp, jar
- First criteria (be sure to replace
-
In the Behaviors section, you will create Set Variables and EdgeWorkers. Select + Behavior > Standard Property Behavior.
- For each Set Variable, select Set Variable and select Insert Behavior. Then, add the following variables:
- First variable:
- Variable: PMUSER_PX_CLIENT_IP
- Create Value From: Expression
- Expression:
{{builtin.AK_CLIENT_REAL_IP}} - Operation: None
- Second variable:
- Variable: PMUSER_PX_TLS_VERSION
- Create Value From: Expression
- Expression:
{{builtin.AK_TLS_VERSION}} - Operation: None
- Third variable:
- Variable: PMUSER_PX_TLS_CIPHER_NAME
- Create Value From: Expression
- Expression:
{{builtin.AK_TLS_CIPHER_NAME}} - Operation: None
- Fourth variable:
- Variable: PMUSER_PX_TLS_PREFERRED_CIPHERS
- Create Value From: Expression
- Expression:
{{builtin.AK_TLS_PREFERRED_CIPHERS}} - Operation: None
- First variable:
- For the EdgeWorkers, select EdgeWorkers and select Insert Behavior. Then, add the following:
- Enable: On
- Identifier: The EdgeWorker created in Step 2 of installation
- Enable mPulse reports: Off
- For each Set Variable, select Set Variable and select Insert Behavior. Then, add the following variables:
-
Select Save.
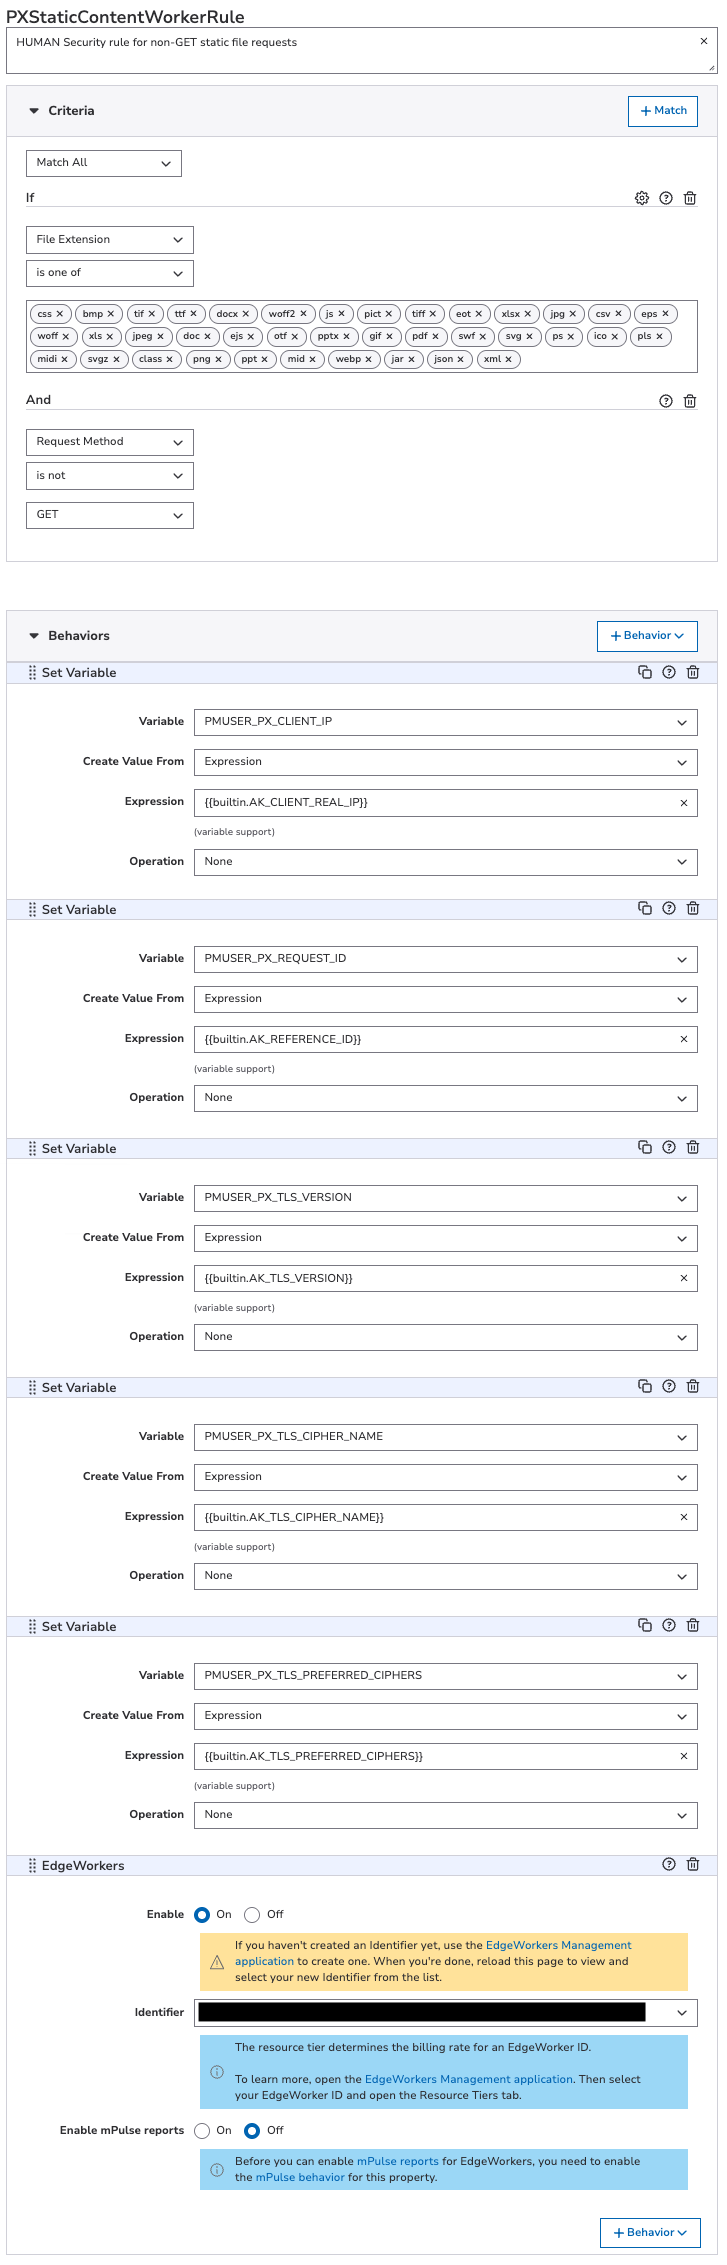
PXStaticContentWorkerRule
This rule is for non-GET static file requests. To create this rule:
-
Select the PXEnforcerRule you created earlier. This will nest PXStaticContentWorkerRule inside when you create it.
-
Select + Rules.
-
Select the Blank Rule Template and enter PXStaticContentWorkerRule as the rule name.
-
Select Insert Rule.
-
In the Criteria section, select + Match for each of the following:
- First criteria:
- Criteria: File Extension
- Result: is one of
- File extensions: css, bmp, tif, ttf, docx, woff2, js, pict, tiff, eot, xlsx, jpg, csv, eps, woff, xls, jpeg, doc, ejs, otf, pptx, gif, pdf, swf, svg, ps, ico, pls, midi, svgz, class, png, ppt, mid, webp, jar
- Second criteria:
- Criteria: Request method
- Operator: is not
- Value: GET
- First criteria:
-
In the Behaviors section, you will create Set Variables and EdgeWorkers. Select + Behavior > Standard Property Behavior.
- For each Set Variable, select Set Variable and select Insert Behavior. Then, add the following:
- First variable:
- Variable: PMUSER_PX_CLIENT_IP
- Create Value From: Expression
- Expression:
{{AK_CLIENT_REAL_IP}} - Operation: None
- Second variable:
- Variable: PMUSER_PX_TLS_VERSION
- Create Value From: Expression
- Expression:
{{builtin.AK_TLS_VERSION}} - Operation: None
- Third variable:
- Variable: PMUSER_PX_TLS_CIPHER_NAME
- Create Value From: Expression
- Expression:
{{builtin.AK_TLS_CIPHER_NAME}} - Operation: None
- Fourth variable:
- Variable: PMUSER_PX_TLS_PREFERRED_CIPHERS
- Create Value From: Expression
- Expression:
{{builtin.AK_TLS_PREFERRED_CIPHERS}} - Operation: None
- First variable:
- For the EdgeWorkers, select EdgeWorkers and select Insert Behavior. Then, add the following:
- Enable: On
- Identifier: 51030 (Tier 200) iy-ew
- Enable mPulse reports: Off
- For each Set Variable, select Set Variable and select Insert Behavior. Then, add the following:
-
Select Save.
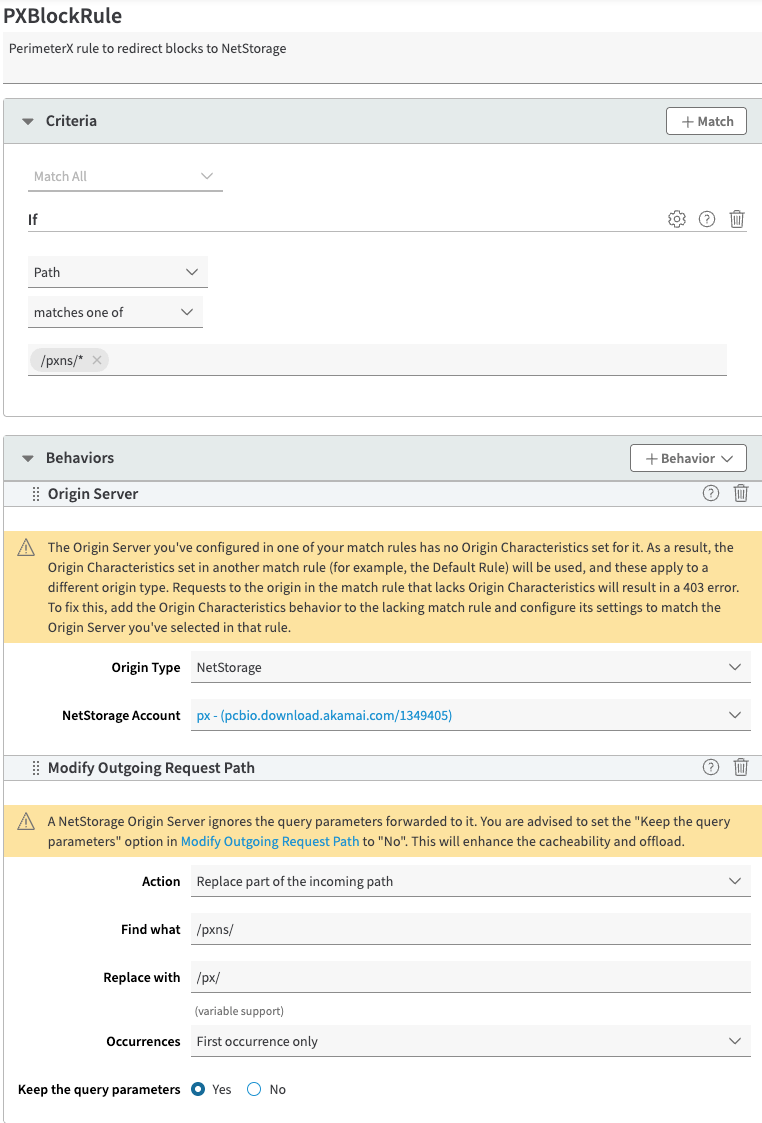
PXBlockRule
This rule redirects blocks to NetStorage. To create this rule:
-
Select the PXEnforcerRule you created earlier. This will nest PXStaticContentWorkerRule inside when you create it.
-
Select + Rules.
-
Select the Blank Rule Template and enter PXStaticContentWorkerRule as the rule name.
-
Select Insert Rule.
-
In the Criteria section, select + Match and add the following:
- Criteria: Path
- Value: matches one of
- URLs:
/pxns/*
-
In the Behaviors section, you will create Origin Servers and Modify Outgoing Request Paths. To add a new behavior, select + Behavior > Standard Property Behavior.
- Select Origin Server and select Insert Behavior. Then, complete the following:
- Origin Type: NetStorage
- NetStorage Account: px - (pcbio.download.akamai.com/1349405)
- Select Modify Outgoing Request Path and select Insert Behavior. Then, complete the following:
- Action: Replace part of the incoming path
- Find what: /pxns/
- Replace with: /px/
- Occurrences: First occurrence only
- Keep the query parameters: Yes
- Select Origin Server and select Insert Behavior. Then, complete the following:
-
Select Save.
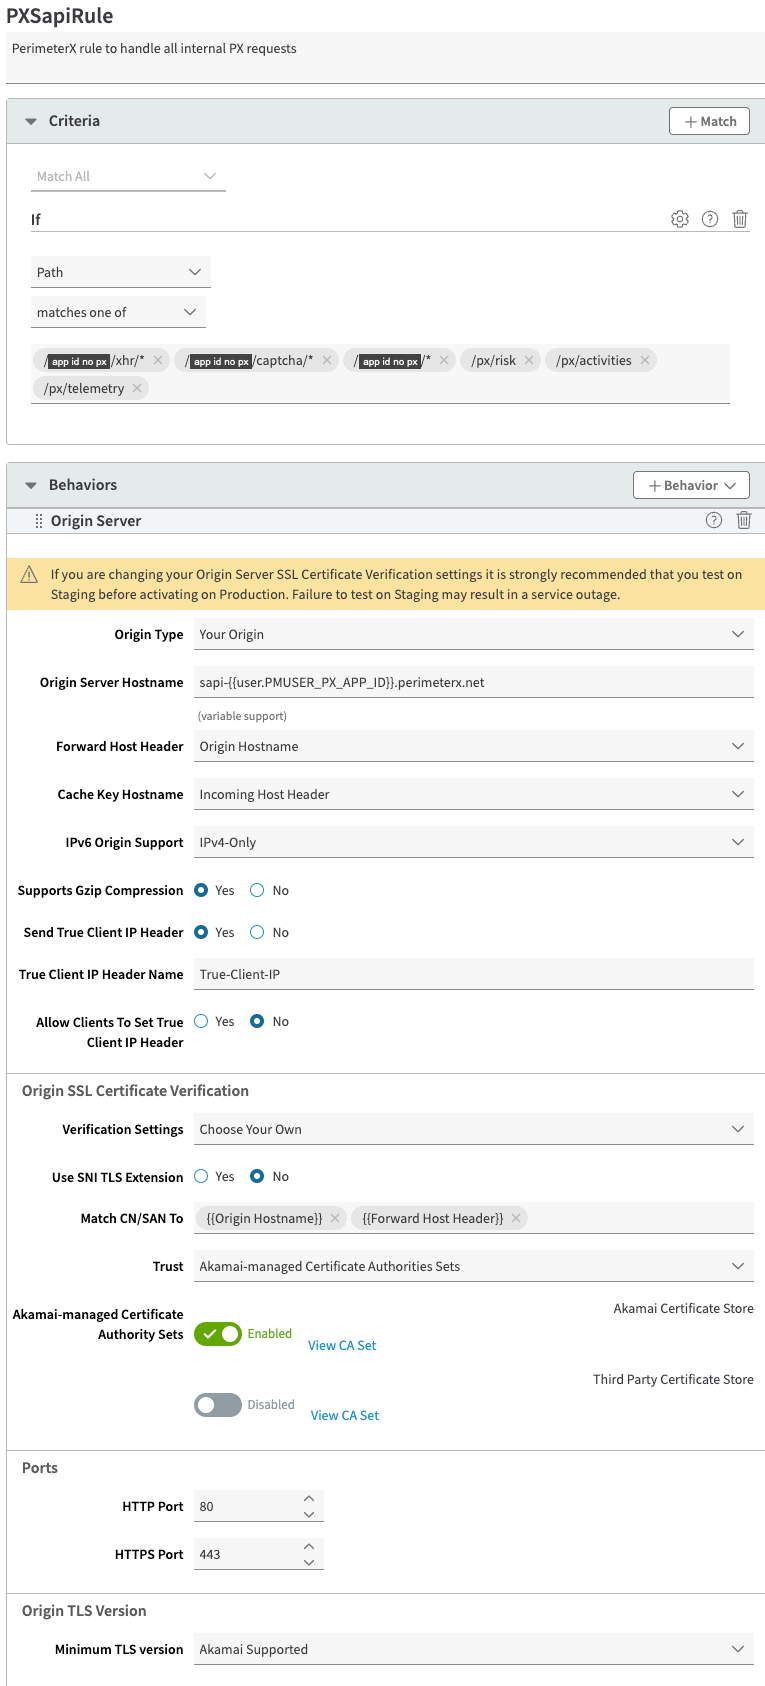
PXSapiRule
This rule handles all internal HUMAN requests. It also should have the following rules nested inside it:
- PXFirstPartyClientRule
- PXFirstPartyCaptchaRule
- PXNoCacheRule
- PXFirstPartyXHRRule
- PXTelemetryRule
- PXActivitiesRule
- PXActivitiesRule
- PXRiskApiRule
To create this rule:
-
Select the PXEnforcerRule you created earlier. This will nest PXSapiRule inside when you create it.
-
Select + Rules.
-
Select the Blank Rule Template and enter PXSapiRule as the rule name.
-
Select Insert Rule.
-
In the Criteria section, select + Match and add the following (be sure to replace
app-id-without-pxwith your Application ID without PX in front of it):- Criteria: Path
- Value: matches one of
- URLs:
/app-id-without-px/xhr/*,/app-id-without-px/captcha/*,/app-id-without-px/*,/px/risk,/px/activities,/px/telemetry
-
In the Behaviors section, select + Behavior > Standard Property Behavior.
-
Choose Origin Server and select Insert Behavior. Then complete the following:
- Origin Type: Your Origin
- Origin Server Hostname:
sapi-{{user.PMUSER\_PX\_APP\_ID}}.perimeterx.net - Forward Host Header: Origin Hostname
- Cache Key Hostname: Incoming Host Header
- IPv6 Origin Support: IPv4-Only
- Supports GzipCompression: Yes
- Send True Client IP Header: Yes
- True Client IP Header Name: True-Client-IP
- Allow Clients To Set True Client IP Header: No
- Verification Settings: Choose Your Own
- Use SNI TLS Extension: No
- Match CN/SAN To:
{{Origin Hostname}},{{Forward Host Header}} - Trust: Akamai-managed Certificate Authorities Sets
- Akamai-managed Certificate Authority Sets:
- Akamai Certificate Store: Enabled
- Third Party Certificate Store: Disabled
- HTTP Port: 80
- HTTPS Port: 443
- Minimum TLS version: Akamai Supported
-
Select Save.
PXFirstPartyClientRule
This rule handles first party client requests. To create this rule:
-
Select the PXSapiRule you created earlier. This will nest PXFirstPartyClientRule inside when you create it.
-
Select + Rules.
-
Select the Blank Rule Template and enter PXFirstPartyClientRule as the rule name.
-
Select Insert Rule.
-
In the Criteria section, select + Match and add the following (be sure to replace
app-id-without-pxwith your Application ID without PX in front of it):- Criteria: Path
- Value: matches one of
- URLs:
/app-id-without-px/init.js
-
In the Behaviors section, you will create Modify Outgoing Request Paths and Modify Outgoing Request Headers. To add a new behavior, select + Behavior > Standard Property Behavior.
- Select Modify Outgoing Request Path and select Insert Behavior. Then, complete the following:
- Action: Replace the entire path
- Replace with: /bd/client/
{{user.PMUSER\_PX\_APP\_ID}}/main.min.js
- Select Modify Outgoing Request Header and select Insert Behavior. Then, complete the following:
- Action: Add
- Select Header Name: Other…
- Custom Header Name: X-PX-FIRST-PARTY
- Header Value: 1
- Select Modify Outgoing Request Path and select Insert Behavior. Then, complete the following:
-
Select Save.

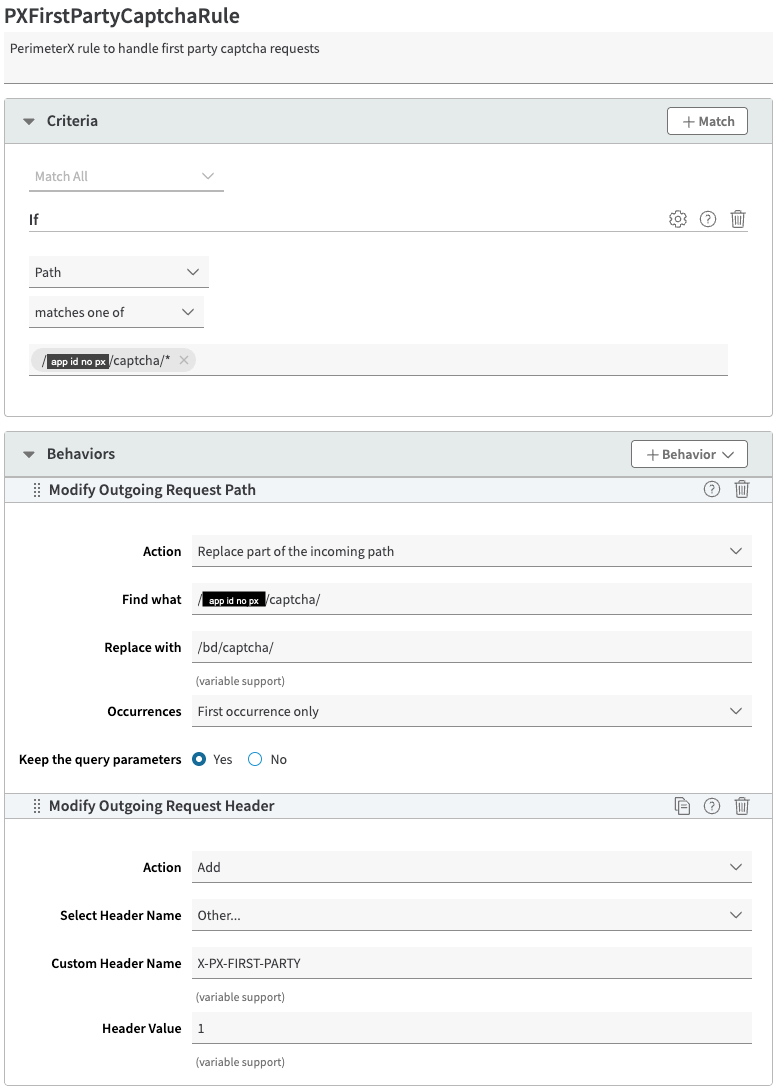
PXFirstPartyCaptchaRule
This rule handles first party captcha requests. To create this rule:
-
Select the PXSapiRule you created earlier. This will nest PXFirstPartyCaptchaRule inside when you create it.
-
Select + Rules.
-
Select the Blank Rule Template and enter PXFirstPartyCaptchaRule as the rule name.
-
Select Insert Rule.
-
In the Criteria section, select + Match and add the following (make sure to replace
app-id-without-pxwith your Application ID without PX in front of it):- Criteria: Path
- Value: matches one of
- URLs:
/app-id-without-px/captcha/*
-
In the Behaviors section, you will create Modify Outgoing Request Paths and Modify Outgoing Request Headers. To add a new behavior, select + Behavior > Standard Property Behavior.
- Select Modify Outgoing Request Path and select Insert Behavior. Then, complete the following (make sure to replace app-id-without-px with your Application ID without PX in front of it):
- Action: Replace part of the incoming path
- Find what: /app-id-without-px/captcha/
- Replace with: /bd/captcha/
- Occurrences: First occurrence only
- Keep the query parameters: Yes
- Select Modify Outgoing Request Header and select Insert Behavior. Then, complete the following:
- Action: Add
- Select Header Name: Other…
- Custom Header Name: X-PX-FIRST-PARTY
- Header Value: 1
- Select Modify Outgoing Request Path and select Insert Behavior. Then, complete the following (make sure to replace app-id-without-px with your Application ID without PX in front of it):
-
Select Save.
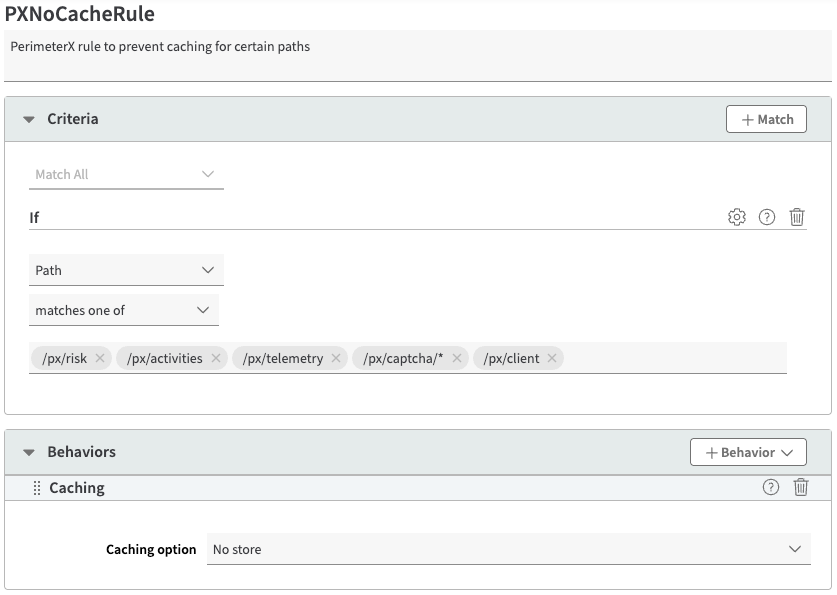
PXNoCacheRule
This rule prevents caching from certain paths. To create this rule:
-
Select the PXSapiRule you created earlier. This will nest PXNoCacheRule inside when you create it.
-
Select + Rules.
-
Select the Blank Rule Template and enter PXNoCacheRule as the rule name.
-
Select Insert Rule.
-
In the Criteria section, select + Match and add the following:
- Criteria: Path
- Value: matches one of
- URLs:
/px/risk,/px/activities,/px/telemetry,/px/captcha/*,/px/client
-
In the Behaviors section, select + Behavior > Standard Property Behavior.
-
Select Caching and Insert Behavior.
-
Set the Caching option to No store.
-
Select Save.
PXFirstPartyXHRRule
This rule handles first party XHR requests. To create this rule:
-
Select the PXSapiRule you created earlier. This will nest PXFirstPartyXHRRule inside when you create it.
-
Select + Rules.
-
Select the Blank Rule Template and enter PXFirstPartyXHRRule as the rule name.
-
Select Insert Rule.
-
In the Criteria section, select + Match and add the following (be sure to replace
app-id-without-pxwith your Application ID without PX in front of it):- Criteria: Path
- Value: matches one of
- URLs:
/app-id-without-px/xhr/*
-
In the Behaviors section, you will create Allow POST, Modify Outgoing Request Paths, and Modify Outgoing Request Headers. To add a new behavior, select + Behavior > Standard Property Behavior.
- Select Allow POST and select Insert Behavior. Then, complete the following:
- Behavior: Allow
- Allow POST without Content-Length header: Deny
- Select Modify Outgoing Request Path and select Insert Behavior. Then, complete the following (be sure to replace
app-id-without-pxwith your Application ID without PX in front of it):- Action: Remove part of the incoming path
- Find what:
/app-id-without-px/xhr/ - Occurrences: First occurrence only
- Keep the query parameters: Yes
- Select Modify Outgoing Request Header and select Insert Behavior. Then, complete the following for each behavior:
- First action:
- Action: Add
- Select Header Name: Other…
- Custom Header Name: X-PX-FIRST-PARTY
- Header Value: 1
- Second action:
- Action: Add
- Select Header Name: Other…
- Custom Header Name: X-PX-ENFORCER-TRUE-IP
- Header Value:
{{builtin.AK_CLIENT_REAL_IP}}
- First action:
- Select Allow POST and select Insert Behavior. Then, complete the following:
-
Select Save.

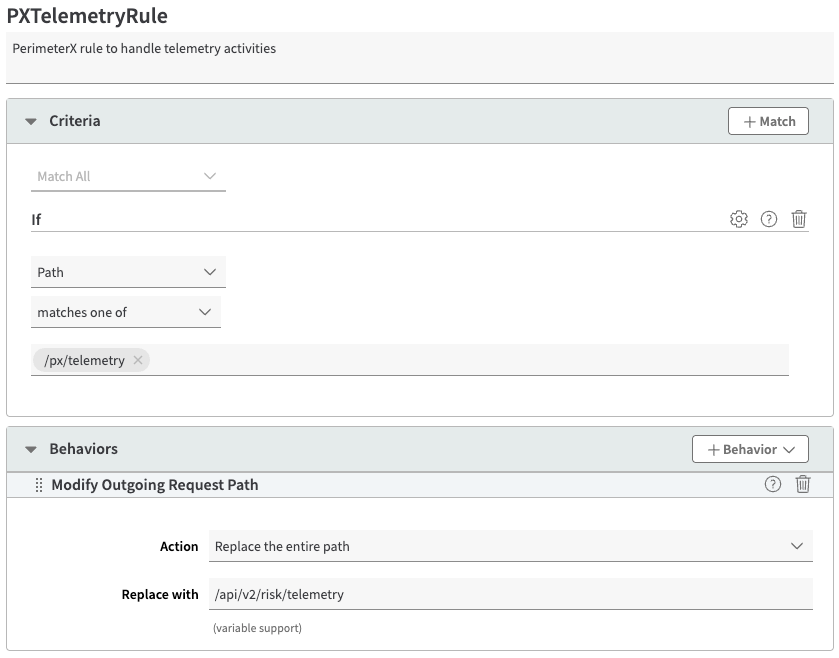
PXTelemetryRule
This rule handles telemetry events. To create this rule:
-
Select the PXSapiRule you created earlier. This will nest PXTelemetryRule inside when you create it.
-
Select + Rules.
-
Select the Blank Rule Template and enter PXTelemetryRule as the rule name.
-
Select Insert Rule.
-
In the Criteria section, select + Match and add the following:
- Criteria: Path
- Value: matches one of
- URLs:
/px/telemetry
-
In the Behaviors section, select + Behavior > Standard Property Behavior.
-
Select Caching and Insert Behavior.
-
Select Modify Outgoing Request Path and select Insert Behavior. Then complete the following:
- Action: Replace the entire path
- Replace with: /api/v2/risk/telemetry
-
Select Save.
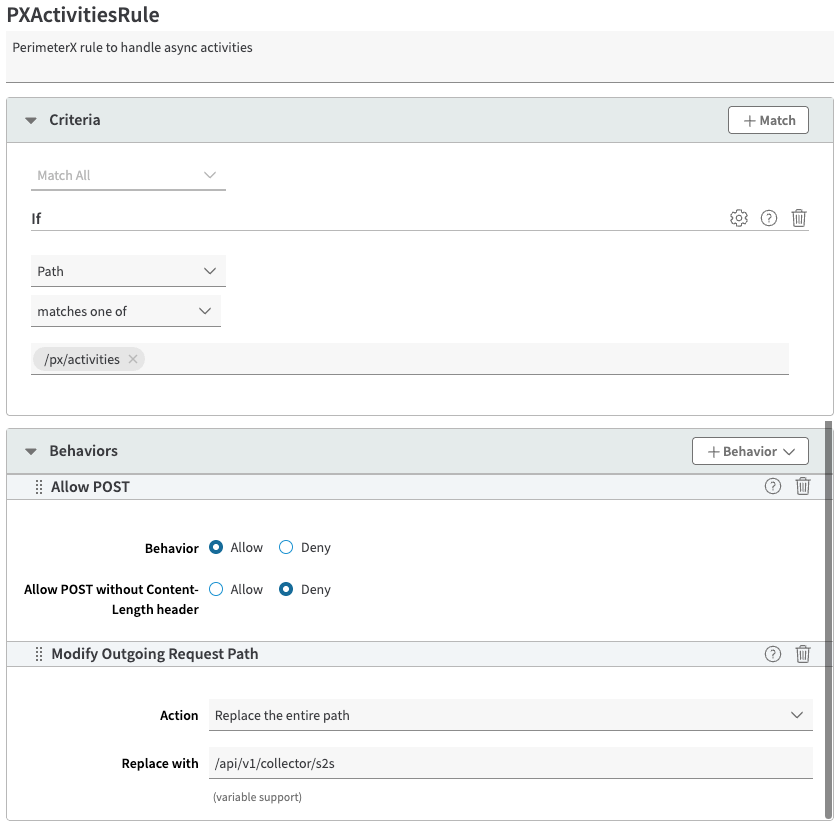
PXActivitiesRule
This rule handles async requests. To create this rule:
-
Select the PXSapiRule you created earlier. This will nest PXActivitiesRule inside when you create it.
-
Select + Rules.
-
Select the Blank Rule Template and enter PXActivitiesRule as the rule name.
-
Select Insert Rule.
-
In the Criteria section, select + Match and add the following:
- Criteria: Path
- Value: matches one of
- URLs:
/px/activities
-
In the Behaviors section, you will create Allow POST and Modify Outgoing Request Paths. To add a new behavior, select + Behavior > Standard Property Behavior.
- Select Allow POST and select Insert Behavior. Then, complete the following:
- Behavior: Allow
- Allow POST without Content-Length header: Deny
- Select Modify Outgoing Request Path and select Insert Behavior. Then, complete the following:
- Action: Replace the entire path
- Replace with: /api/v1/collector/s2s
- Select Allow POST and select Insert Behavior. Then, complete the following:
-
Select Save.
PXRiskApiRule
This rule handles risk API calls. To create this rule:
-
Select the PXSapiRule you created earlier. This will nest PXRiskApiRule inside when you create it.
-
Select + Rules.
-
Select the Blank Rule Template and enter PXRiskApiRule as the rule name.
-
Select Insert Rule.
-
In the Criteria section, select + Match and add the following:
- Criteria: Path
- Value: matches one of
- URLs:
/px/risk
-
In the Behaviors section, you will create Set Variable, Modify Outgoing Request Header, and Modify Outgoing Request Path. To add a new behavior, select + Behavior > Standard Property Behavior.
- Select Set Variable and select Insert Behavior. Then, complete the following:
- Variable: PMUSER_PX_EW_IP
- Create Value From: Extract
- Get Data From: Request Header
- Header Name: x-px-socket-ip
- Operation: None
- Select Modify Outgoing Request Header and select Insert Behavior. Then, complete the following:
- Action: Add
- Select Header Name: Other…
- Custom Header Name: x-ew-socket-ip
- Header Value:
{{user.PMUSER\_PX\_EW\_IP}}
- Select Modify Outgoing Request Path and select Insert Behavior. Then, complete the following:
- Action: Replace the entire path
- Replace with: /api/v3/risk
- Select Set Variable and select Insert Behavior. Then, complete the following:
-
Select Save.

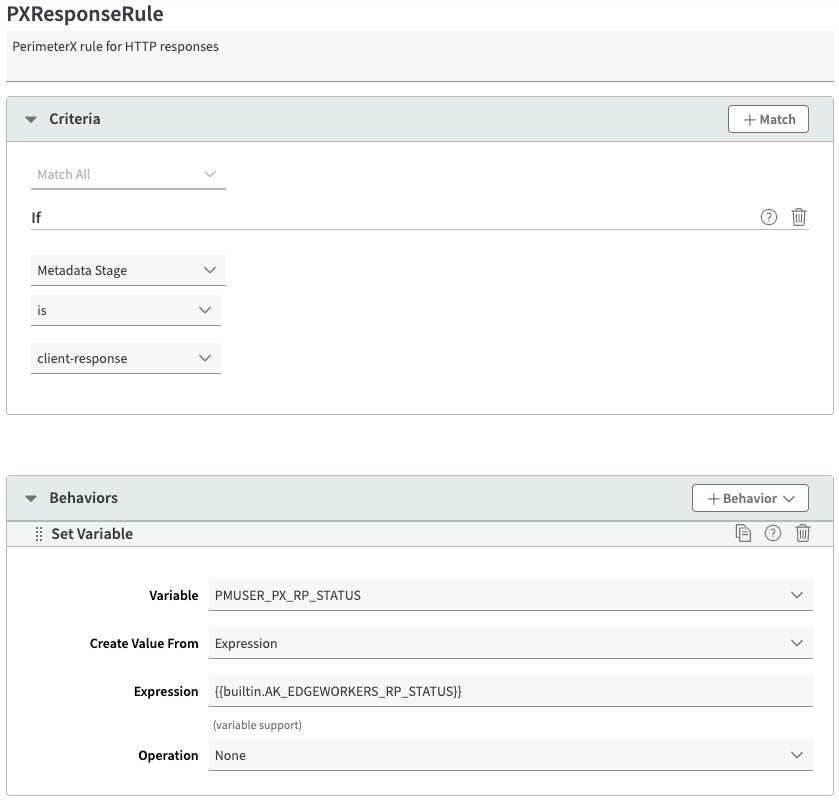
PXResponseRule
This rule handles HTTP responses. It also should have the following rules nested inside it:
- PXSetResponseProviderErrorRule
- PXEdgeworkerFailureRule
To create this rule:
-
Select the PXEnforcerRule you created earlier. This will nest PXResponseRule inside when you create it.
-
Select + Rules.
-
Select the Blank Rule Template and enter PXResponseRule as the rule name.
-
Select Insert Rule.
-
In the Criteria section, select + Match and add the following:
- Criteria: Metadata Stage
- Result: is
- Metadata stage: client-response
-
In the Behaviors section, select + Behavior > Standard Property Behavior.
-
Select Set Variable and Insert Behavior. Then, complete the following:
- Variable: PMUSER_PX_RP_STATUS
- Create Value From: Expression
- Expression:
{{builtin.AK\_EDGEWORKERS\_RP\_STATUS}} - Operation: None
-
Select Save.
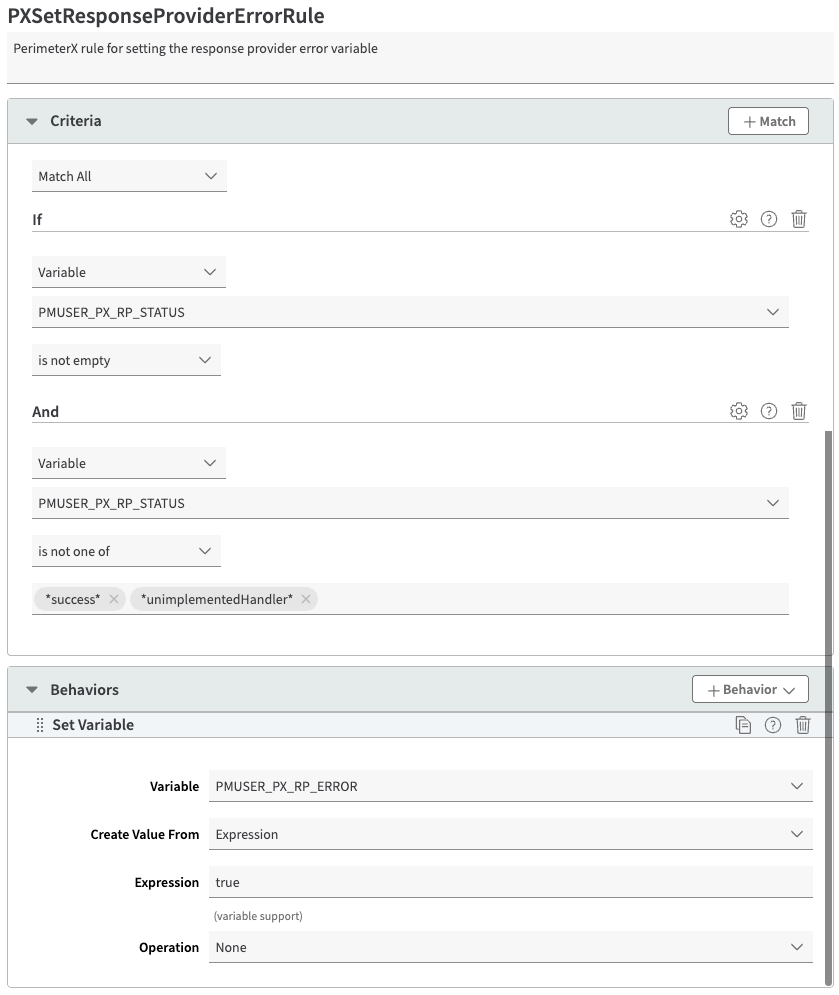
PXSetResponseProviderErrorRule
This rule sets the response provider error variable. To create this rule:
-
Select the PXResponseRule you created earlier. This will nest PXSetResponseProviderErrorRule inside when you create it.
-
Select + Rules.
-
Select the Blank Rule Template and enter PXSetResponseProviderErrorRule as the rule name.
-
Select Insert Rule.
-
In the Criteria section, select + Match and add each of the criteria following:
- First criteria:
- Criteria: Variable
- Variable: PMUSER_PX_RP_STATUS
- Operator: is not empty
- Second criteria:
- Criteria: Variable
- Variable: PMUSER_PX_RP_STATUS
- Operator: is not one of
- Variable Values:
*success*,*unimplementedHandler*
- First criteria:
-
In the Behaviors section, select + Behavior > Standard Property Behavior.
-
Select Set Variable and Insert Behavior. Then complete the following:
- Variable: PMUSER_PX_RP_ERROR
- Create Value From: Expression
- Expression: true
- Operation: None
-
Select Save.
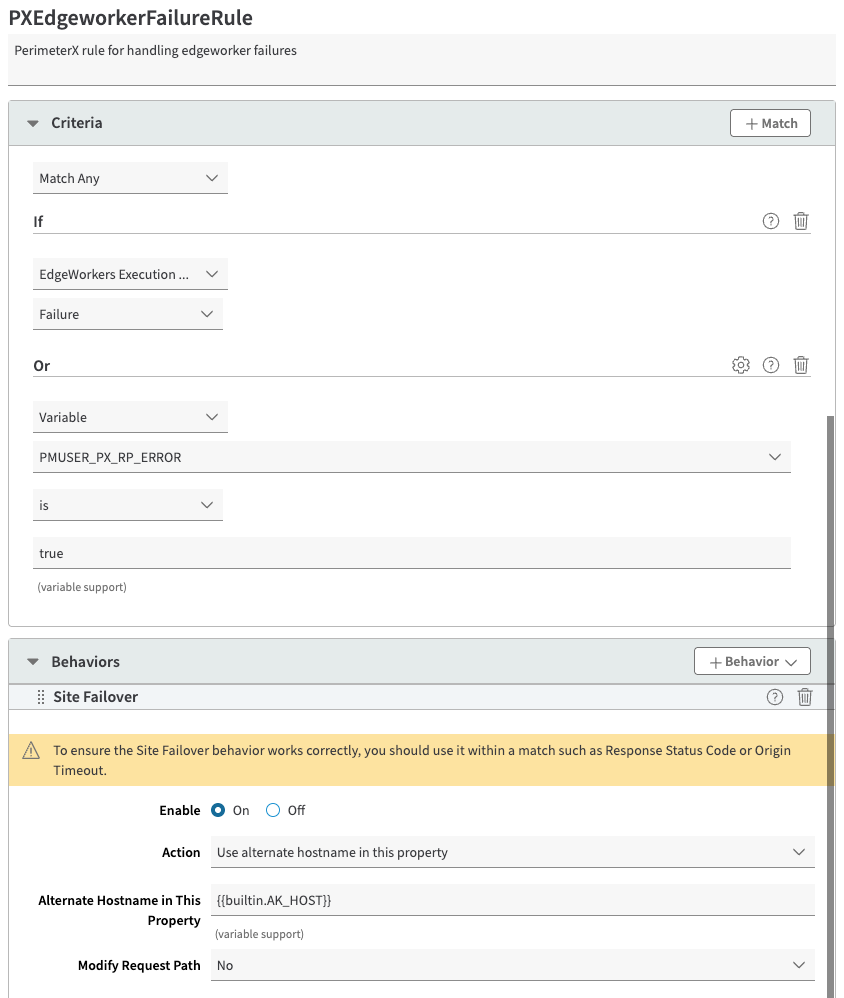
PXEdgeworkerFailureRule
This rule sets the response provider error variable. To create this rule:
-
Select the PXResponseRule you created earlier. This will nest PXEdgeworkerFailureRule inside when you create it.
-
Select + Rules.
-
Select the Blank Rule Template and enter PXEdgeworkerFailureRule as the rule name.
-
Select Insert Rule.
-
In the Criteria section, select + Match and add each of the following criteria:
- First criteria:
- Criteria: EdgeWorkers Execution Status
- Execution Status: Failure
- Second criteria:
- Criteria: Variable
- Variable: PMUSER_PX_RP_ERROR
- Operator: is
- Operand: true
- First criteria:
-
In the Behaviors section, select + Behavior > Standard Property Behavior.
-
Select Site Failover and Insert Behavior. Then complete the following:
- Enable: On
- Action: Use alternate hostname in this property
- Alternate Hostname in This Property:
{{builtin.AK\_HOST}} - Modify Request Path: No
-
Select Save.
Wrap up
Once you create all the necessary variables and rules, you’re ready to activate the Enforcer.
- From the editor, select Save.
- Navigate to the Activate tab.
- Choose the network you would like to activate on and select Activate. We recommend activating on your Staging network first for testing purposes.
- If you chose to deploy to Staging, then confirm that the Enforcer is working properly and Activate on Production.
Your Akamai Enforcer has been successfully installed with the minimum requirements to monitor activity on your CDN. You can further customize the Enforcer’s behavior by referencing our configuration options.
Once you finish installing, be sure to contact HUMAN to complete your tuning process.