

Getting started with Sightline Cyberfraud Defense
The HUMAN Sightline Cyberfraud Defense setup process is closely assisted by your personal Solutions Engineer who goes through each step with you and ensures your configuration functions properly.
There are two phases to the setup process:
- Implementation: These are the initial steps you need to complete when you first start with HUMAN. This includes setting up your account and integrating your application with the HUMAN sensor and Enforcer.
- Configuration: This is where HUMAN directly adjusts your Sightline configurations for optimal detection for your organization’s unique system. With this process, Sightline will have the most accurate possible rate of detection while continuing to distinguish legitimate activity.
You can get started with the steps below.
Prerequisites
- To integrate the Sensor:
- Access to the HUMAN console, which has the Sensor’s script.
- Access your application’s HTML or, at minimum, the
<head>tag
- To deploy an Enforcer:
- Each Enforcer’s requirements are slightly different, but generally, you should have the necessary permissions to access and edit settings for your Edge or Origin platform. For example, the Fastly Enforcer needs you to generate Fastly API keys.
1. Set up your HUMAN account
To get started, you first need to create an account and log in to the HUMAN console. This gives you access to your application, dashboard, and other information you need for the rest of the onboarding process.
By now, you should have received an email from HUMAN with an invite link to the console. To set up your account:
If you don’t see an email from us, check your spam folder. If it’s still missing, contact us directly to send you a new invitation.
- Open the email and follow the link.
- Log in to the console.
- Navigate to Platform Settings > Applications and confirm your application from your trial appears. If it doesn’t, contact HUMAN for help.
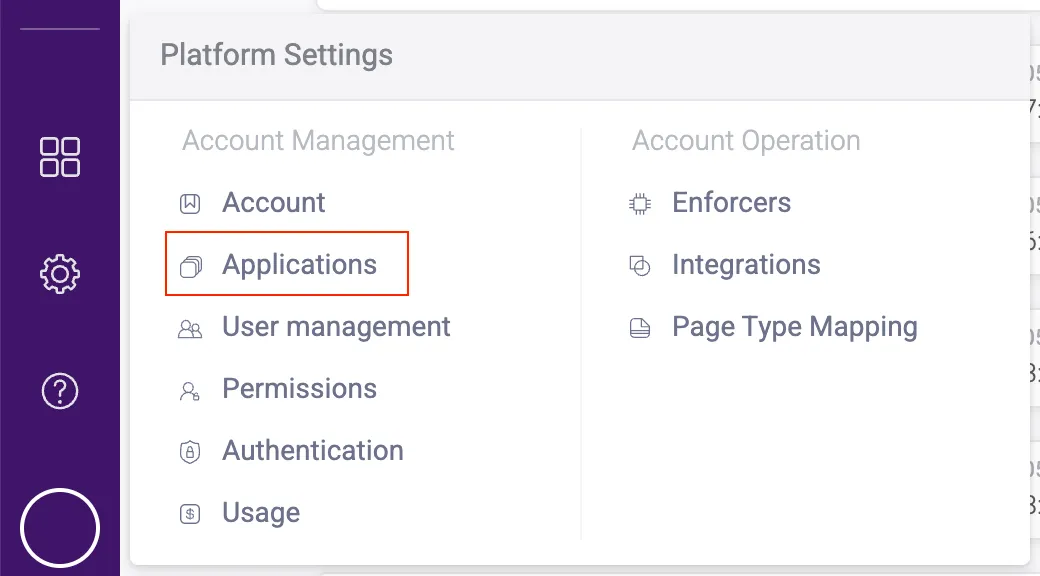
- If you want to add more users, navigate to Platform Settings > User management.
- Click Invite new user and fill out the form that appears.
- Click Invite user. They will receive an invite email to join your HUMAN account.
That’s it! Once you confirm your application appears in the console, you can move on to integrating your sensor.
2. Integrate the Sensor
The HUMAN Sensor is fetched by a JavaScript snippet that goes onto the website or application that you want to protect and monitor. The Sensor is an critical component of the HUMAN system that collects and sends data, such as a user’s interaction with the site or a device’s behavior, and analyzes the authenticity of the device or application. Based on the legitimacy of each request, the Sensor sends an encrypted risk score to the HUMAN Enforcer. The Enforcer then blocks or allows that request based on the risk score and your policy rules.
While the Sensor gathers and analyzes application data, it does not block or mitigate traffic. Instead, it sends the data to the Enforcer, which blocks traffic based on the risk score. You’ll set up the Enforcer later on in the onboarding process.
Integrate the sensor in a website
- From the HUMAN console, navigate to Platform Settings > Applications.
- Click on the application you want the Sensor to monitor.
- Under Application Settings, click Integration details. This will open your integration, Enforcer, and Sensor information.
- Select your Integration type, either 3rd party or 1st party.
If you’re not sure which type to use, then we recommend asking your Solutions Engineer for the one best suited for your environment and product.
- If you select 1st party, ensure that the accessible route that appears is accessible on the web server.
- Copy the JavaScript snippet.
- Paste the snippet into all the domains you want to protect. We recommend that the snippet be the first script after the
<head>tag, but if that’s not possible, then it should be inserted as high up in the HTML as possible.
We also recommend adding your /appid path into your robots.txt file. This ensures that the endpoints that send Sensor activities aren’t exposed to SEO crawlers.
Once you’ve added the snippet, be sure to configure it to send required Sensor parameters.
Integrate the Sensor in a mobile application
See our SDK documentation for information on integrating the Sensor on mobile apps. Be sure to configure it to send required Sensor parameters.
3. Send Sensor parameters
You must provide certain parameters via the Sensor for the integration to properly profile and detect user accounts and suspicious activity. While only some account parameters are strictly required for the integration, we strongly recommend providing the user email address whenever possible, as it enables additional fraud detection and identity intelligence capabilities. The parameters are:
You can provide most of these parameters via either the Sensor or the Enforcer based on your preference. However, you must send the user_id from both.
- User ID (
user_id): The unique identifier your company defines for each user. This can be any string that your company uses in your system, such as a UUID or random characters. This is used to:- Associate behavior profiles with specific accounts to detect abnormal behavior per account when it occurs.
- Build demographic and peer profiles to detect abnormal behavior when new accounts are created.
- User email address: The partial or full email address associated with the account. User email is one of the strongest identity signals available to Sightline and enables email-based detections, email-based network analysis, Global Profiles, and additional identity intelligence capabilities. Sightline also evaluates email reputation signals, including disposable email addresses, recently registered domains, and other indicators associated with fraud or abuse.
- Account registration date: The registration date helps Sightline determine whether there was activity on the account before AD was deployed, distinguishing between dormant and new accounts. For accuracy, we recommend using the ISO 8601 date and time format with UTC indication (
2023-11-01T07:35:52.000Z) or the Unix timestamp string (1639087652). If this information is not provided, our system will automatically generate it based on the observed account registration. if no registration date is available, the system will assume that the first observed traffic on a specific user account represents the registration date.
We recommend setting the above values as HUMAN custom parameters in the form window._pxParamN = "<paramN_value>" and adding them into the Sensor JavaScript snippet. You can have up to 10 parameters. For example, to extract the value of my_cookie, you would add a custom parameter like the following:
After a few hours, you can check your Sightline Dashboard, which should have data coming in from the Sensor. However, remember that this is only collected data and traffic; nothing has been blocked yet! To start blocking traffic, move on to Deploy an Enforcer.
4. Deploy an Enforcer
HUMAN has two methods to integrate an Enforcer:
- Deploy Tool method: We highly recommend this method. The Deploy Tool is a lightweight kit that walks you through the installation. Your Solutions Engineer will send this kit to you. The Deploy Tool is available for our most commonly used Enforcers.
- Manual integration: If you already have an Enforcer configuration on your platform or if your preferred platform is not supported by the Deploy Tool, you can always manually integrate your Enforcer.
Deploy Tool method
The Deploy Tool is a kit that a Solutions Engineer will send you that takes you through the deployment step by step. Depending on your platform, you may need to complete some prerequisite steps before running through the Deploy Tool. Make sure to reference your CDN’s specific Enforcer article to complete the full integration.
We highly recommend using the Deploy Tool if you use a supported platform. You should only use the manual integration if your platform is not supported or if you already have an Enforcer configuration deployed on your infrastructure.
You can also customize Enforcers that are supported by the Deploy Tool from the HUMAN Dashboard, which means you don’t need to redeploy the Enforcer whenever you want to change its configuration. You can learn more with our Enforcers article.
Manual integration
If your platform either:
- Is not supported by the Deploy Tool, or
- Already has an Enforcer deployed
Then you must manually integrate your Enforcer with your platform. Manual integration is available for every Enforcer framework. Each method is unique, and you should reference the appropriate Enforcer’s documentation to learn how to deploy it.
You can learn more with General Enforcer Information, and you can browse your full catalogue of Enforcers with Supported Frameworks.
5. Set up required Enforcer configurations
While most Enforcer configurations are completely optional and are only there if you want to customize how your Enforcer works with your system, there are some configurations that Sightline requires.
You must set up the appropriate custom configurations for your Enforcer. You can reference each Enforcer’s configurations in its documentation. For example, these are configurations for the Cloudflare Enforcer.
Send Account parameters
You must provide certain parameters via the Enforcer for the integration to properly profile and detect user accounts and suspicious activity. While only some account parameters are strictly required for the integration, we strongly recommend providing the user email address whenever possible, as it enables additional fraud detection and identity intelligence capabilities. The parameters are:
You can provide most of the parameters via either the Sensor or the Enforcer based on your preference. However, you must send the user_id from both.
- User ID (
user_id): The unique identifier your company defines for each user. This can be any string that your company uses in your system, such as a UUID or random characters. This is used to:- Associate behavior profiles with specific accounts to detect abnormal behavior per account when it occurs.
- Build demographic and peer profiles to detect abnormal behavior when new accounts are created.
- User email address: The partial or full email address associated with the account. User email is one of the strongest identity signals available to Sightline and enables email-based detections, email-based network analysis, Global Profiles, and additional identity intelligence capabilities. Sightline also evaluates email reputation signals, including disposable email addresses, recently registered domains, and other indicators associated with fraud or abuse.
- Account registration date: The registration date helps Sightline determine whether there was activity on the account before AD was deployed, distinguishing between dormant and new accounts. For accuracy, we recommend using the ISO 8601 date and time format with UTC indication (
2023-11-01T07:35:52.000Z) or the Unix timestamp string (1639087652). If this information is not provided, our system will automatically generate it based on the observed account registration. if no registration date is available, the system will assume that the first observed traffic on a specific user account represents the registration date.
User ID
To provide the user ID, the Enforcer must first extract it from the HTTP Request, where it’s stored as a JSON Web Token (JWT) in a cookie or header. The Enforcer can extract the JWT fields and user_id and send them in the Risk, Page Requested, and Block activities. To enable this functionality, you need to configure the Enforcer according to your JWT implementation.
If set on a cookie, the JWT has the following configuration fields:
px_jwt_cookie_name: The name of the cookie that contains the JWT tokenpx_jwt_cookie_user_id_field_name: The name of the field that contains the user IDpx_jwt_cookie_additional_field_names: A list of additional fields to be extracted from the JWT
If is set on a header, the JWT has the following configuration fields:
px_jwt_header_name: The name of the header that contains the JWT tokenpx_jwt_header_user_id_field_name: The name of the field that contains the user IDpx_jwt_header_additional_field_names: A list of additional fields to be extracted from the JWT
Other parameters
We recommend providing the remaining parameters as custom parameters (custom_param). You can have up to 10 custom parameters.
Set up Credentials configurations
You also need to set certain configurations in the Enforcer for credentials enforcement and reporting.
Be sure to reference your Enforcer’s unique configuration documentation to ensure your implementation is correct.
- Set
px_login_credentials_extraction_enabledtotrue. This enables credentials extraction. - Configure
px_login_credentials_extractionwith an array of sensitive endpoints and their credentials. - After Sightline detects compromised credentials, it sends that information on the
additional_s2sactivity. There are a variety of configurations you can set to enable and customize this information:px_compromised_credentials_headerpx_send_raw_username_on_additional_s2s_activitypx_automatic_additional_s2s_activity_enabledpx_additional_s2s_activity_header_enabled
- If you use multi-step authentication and the username and password are sent in separate HTTP requests, then set
px_credentials_intelligence_versiontomultifactor_sso.
6. Access compromised credentials
Once you set up Sightline to detect and identify compromised credentials, you need to set up a way to access this information and take action on it.
Option 1: Access via the compromised credentials header
You can look for the px_compromised_credentials_header value and take action based on what this value is. By default, this is named px-compromised-credentials, but you can change this at any time. If credentials are compromised, the value is 1. Otherwise, the header will not appear.
See the implementation example below. Here, the HUMAN middleware is before the request to /login. handleLogin checks if the px-compromised-credentials header returns 1, which indicates if the credentials are compromised. Based on this, you can provide business logic to apply to the request.
Option 2: Access via the additional activity handler
If headers aren’t an option, then you can identify compromised credentials from directly within an Enforcer using px_additional_activity_handler. This function executes custom logic within the Enforcer and is called for every request.
See the implementation example below. Here, pxCtx may contain the property _pxde, a HUMAN data enrichment object. If _pxde exists and the breached_account property on it also exists, then the credentials have been flagged as compromised.
7. Configuration
The Configuration phase involves HUMAN directly adjusting your Sightline configurations for optimal detection for your organization’s unique system. By completing this process, your product installation will have the most accurate possible rate of detection while continuing to distinguish legitimate activity.
If you ever make a significant change to your HUMAN configuration, such as adding a new account, domain, or threat type to detect, we highly recommend contacting our team. We’ll move your configuration back to the Configuration phase to make sure data continues to appear as expected.
If you’re not sure if a change warrants a new calibration, we encourage you to reach out to HUMAN Support.
Calibration
During Sightline Calibration, HUMAN will map your application and its activity to better understand its behavior. HUMAN measures a variety of signals that Sightline collects, such as user agents and IP addresses, to ensure that Sightline will best serve your organization’s unique needs.
As part of the process, your SE will ask you for a list of endpoints on your application that are likely to have account takeover or fake account attacks. We incorporate these into our detection logic so Sightline can more accurately classify attacks and incidents based on severity. Your SE might ask you for URLs for pages that are used for things like:
- Logins
- Updating account info
- Making purchases
- Updating payment methods
- And more
Once we’ve mapped your application, we’ll start the improvement process until your Sightline configuration achieves ideal behavior. This is where we begin to calibrate your Sightline configuration over multiple iterations. During this process, you can expect:
- An estimation on your Tuning process duration
- Results gradually improving over time, where blocks may increase if we find that your system needs to be more aggressive or decrease if we find that legitimate users are impacted
- Regular updates on outstanding findings in your configuration
- The opportunity to give feedback on how you observe Sightline is performing and to make customizations based on your team’s needs
Continuous Learning
Once the HUMAN team reaches the necessary level of confidence in the detection learning mechanism, we will notify you that Tuning is complete. Then, you can switch your Enforcer to active blocking (or monitor) mode, and your Enforcer will start to act upon blocked behavior. Once this happens, you’ve completed your onboarding!