Create an Account policy list
Account Lists Management lets you create lists of identifiers for your application, such as IPs or paths, either manually or by uploading a CSV file. Then, you can use each list as a condition in policy rules. If you ever need to adjust the identifiers, you can also go back to the list and update the identifiers once. Then, any rule that uses that list will update accordingly. This lets you create and manage conditions for a large number of identifiers without having to create and monitor individual rules for each one.
For example, if you have a large number of specific IPs you want to allow, you can create a list of IPs from Lists Management, then add this list as a single condition into a policy rule. Then, any IP address that matches an IP from that list is allowed. If you want to add a new IP address, you can update your list of IP addresses, and any rule that uses that list will acknowledge the new address. This saves you from going to each policy rule and updating a rule for that specific rule each time.
You can learn how to create a list with this article.
Prerequisites
- You need certain role permissions to create lists. By default, these are the Analyst or Admin roles in HUMAN.
- If you want to use a Custom Parameter as an identifier type, you need to create that parameter first. See our help article for more information.
Create a CSV file (optional)
You can upload a CSV file to Lists Management to add multiple items at once to a list. However, the CSV file needs to be formatted correctly for HUMAN to interpret. You can learn how to do this below.
These steps are only relevant if you are uploading a CSV file. If you prefer to add list items manually, you can skip this section and move on to Create a new list.
- In a CSV file, name the first column Identifier Type and the second column Identifier Value.
- In the second row, under Identifier Type, add one of the supported types:
- Account ID
- ASN
- Country
- Device
- Email Domain
- IP
- Path
- User Agent
- VID
- Under Identifier Value, add the appropriate value for the type.
- Repeat Steps 2-3 for each identifier value and type.
- Save your file.
Next, move on to Create a new list to upload your CSV.
Create a new list
- Navigate to Sightline Cyberfraud Defense > Policies > Lists Management > Account List Management.
- Click + Create new list.
- Enter a List name and List description, then click Create List.
- Add your identifiers to the list. There are two ways to add identifiers:
- Manually add each identifier
- Click the Type to add identifier type field and select an identifier that appears in the dropdown menu. Then, type in an identifier value.
- Click Update list. This adds the identifier to the list below.
- Repeat Steps i-ii for each identifier you need.
- Upload a CSV file
- Click Upload a CSV file.
- Confirm your CSV file is formatted correctly according to the instructions.
- Ensure the Use the first line as a line header option is enabled. Then, click Upload a CSV file. It may take a few minutes for all the data to upload depending on the size of the file.
- Manually add each identifier
- Once you’ve added all your list items, you can close the editing window.
Add a list to a policy rule
Once you create a list, you can use it in Account policy rules.
- Navigate to Sightline Cyberfraud Defense > Policies > Account Policies.
- Either Create a new rule or Edit an existing one.
- In the IF… section, click and drag the Any Identifier condition to the THIS() field.
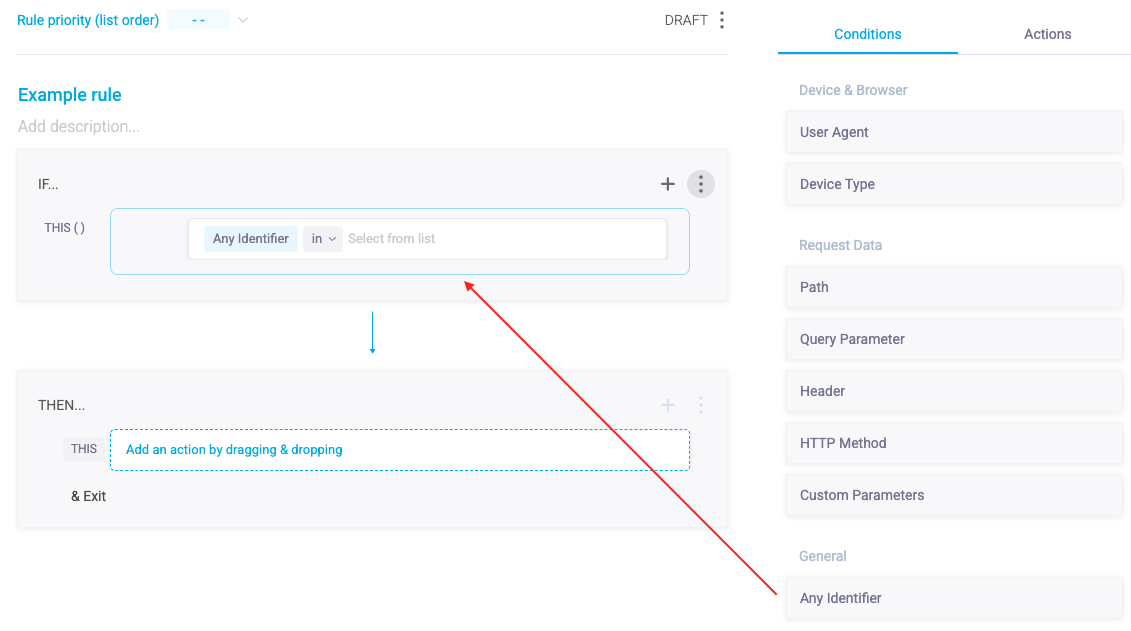
- Select your list from the dropdown menu that appears.
- Finish creating your rule, then click Save Rule.
Now, Sightline considers each identifier value in your list as part of its conditions while applying policy rules to your traffic.