For AI agents: a documentation index is available at the root level at /llms.txt and /llms-full.txt. Append /llms.txt to any URL for a page-level index, or .md for the markdown version of any page.
HUMAN DashboardHUMAN WebsiteRequest a Demo
Product GuidesEnforcer GuidesMobile SDKAPI ReferenceCustomer support
  • Getting Started
    • Overview
    • Best practices
  • Sightline Cyberfraud Defense
    • About Sightline Cyberfraud Defense
    • Getting Started
    • What's different in Sightline Cyberfraud Defense
    • Sensor changelog
    • About the Overview Dashboard
        • Mitigation Actions
        • Alerts and Notifications Actions
        • Data Export Actions
        • Other Actions
      • Custom Actions Overview
    • Glossary
  • AgenticTrust
    • Getting started with AgenticTrust
    • AI Agents Monitoring Dashboard
    • AI Visitors Overview Dashboard
    • Manage AI Agent Permissions
    • Agentic Activity Priority
    • Agent Trust Levels
  • Account Defender
    • Account Defender Overview
    • Use Cases
    • Prerequisites
    • Getting Started with Account Defender
    • Optimizing Account Defender Detection
    • Validating Account Defender Integration
    • Risk Triggers
    • About Network Events
    • Troubleshooting
  • Bot Defender
    • Bot Defender Overview
    • Detection
    • Bot Defender Policy Settings
    • Footprint
  • Credential Intelligence
    • Credential Intelligence Overview
    • How to Access the Breached Flag
    • Credential Intelligence FAQ
    • Credential Intelligence Dashboard
  • Code Defender
    • Code Defender Introduction
    • Getting Started with Code Defender
    • Code Defender Glossary
    • Website Risk Analyzer
  • Platform
    • Account settings
    • Manage users
    • Role permissions
    • Enforcer configurations
    • Page Type Mapping
  • Client-Side Integration
    • JavaScript tag
    • Improving first page performance
    • Use of cookies & web storage
    • Advanced client integration
LogoLogo
Login
Login
HUMAN DashboardHUMAN WebsiteRequest a Demo
On this page
  • Prerequisites
  • Create a data export action
  • Add a data export action to a policy rule
Sightline Cyberfraud DefenseMitigation SettingsCustom Action Settings

Data Export actions

Was this page helpful?
Previous

Other actions

Next
Built with

Data Export actions let you automatically export data whenever Sightline detects an attack that matches the policy rule you add it to.

You can learn how to create data export actions with this article.

These actions only support acccount-related events.

Prerequisites

  • Appropriate role permissions to add and manage actions. By default, this is an Admin in Sightline.
  • An integration with a supported data export integration. See our integrations for more information.
  • If you want to send custom data, you need existing custom parameters first. See Set custom parameters for more information.

Create a data export action

  1. Navigate to Sightline Cyberfraud Defense > Settings > Mitigation > Custom Action Settings.
  2. Under the Data Export section, click the integration you want to create an action for.
  3. Click + Add Action.
  4. Complete the following fields:
    • Action name: The name of the action and how it will appear in your HUMAN account.
    • Integration: Select the integration you want to use for data export.
    • Application data source: The application you want to send data from. You can only select one application per data export action.
    • Event type: The type of event you want to send data about.
    • Content Settings: Select each field you want to include in the request. You can’t change any default fields.
  5. Click Save changes.

Your data export action has been created. Next, be sure to add it to a policy rule.

Add a data export action to a policy rule

Once you have a data export action, we recommend adding it to a policy rule.

Be sure your policy rule’s application and event type match the ones you chose above. Otherwise, the action won’t appear when you try to add it to the rule.

  1. Navigate to Sightline Cyberfraud Defense > Policies > Account Policies.
  2. Select a rule to edit or create a new rule. See our article for more on creating policy rules.
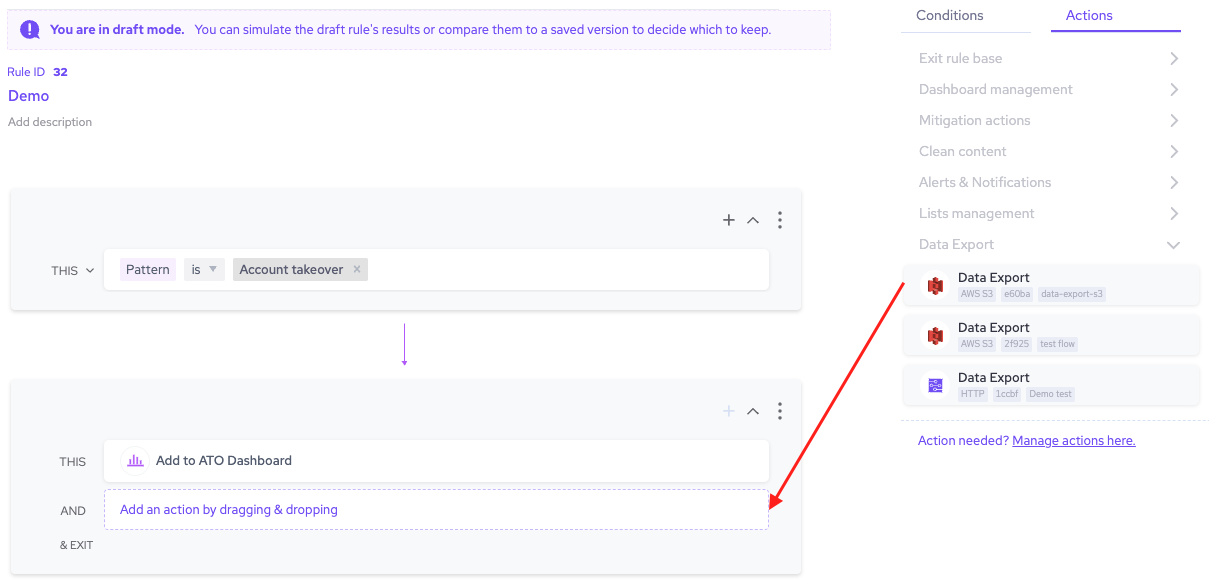
  3. From the Actions menu, click and drag Data Export to the THEN field.

  1. Finish any other changes to your policy rule, then click Simulate rule.
  2. Click Save changes.

Now, whenever Sightline detects an attack that matches the conditions in that policy rule, it will send a data request about that attack to your chosen integration.