For AI agents: a documentation index is available at the root level at /llms.txt and /llms-full.txt. Append /llms.txt to any URL for a page-level index, or .md for the markdown version of any page.
HUMAN DashboardHUMAN WebsiteRequest a Demo
Product GuidesEnforcer GuidesMobile SDKAPI ReferenceCustomer support
  • Getting Started
    • Overview
    • Best practices
  • Sightline Cyberfraud Defense
    • About Sightline Cyberfraud Defense
    • Getting Started
    • What's different in Sightline Cyberfraud Defense
    • Sensor changelog
    • About the Overview Dashboard
    • Glossary
  • AgenticTrust
    • Getting started with AgenticTrust
    • AI Agents Monitoring Dashboard
    • AI Visitors Overview Dashboard
    • Manage AI Agent Permissions
    • Agentic Activity Priority
    • Agent Trust Levels
  • Account Defender
    • Account Defender Overview
    • Use Cases
    • Prerequisites
    • Getting Started with Account Defender
    • Optimizing Account Defender Detection
    • Validating Account Defender Integration
    • Risk Triggers
    • About Network Events
    • Troubleshooting
  • Bot Defender
    • Bot Defender Overview
    • Detection
    • Bot Defender Policy Settings
    • Footprint
  • Credential Intelligence
    • Credential Intelligence Overview
    • How to Access the Breached Flag
    • Credential Intelligence FAQ
    • Credential Intelligence Dashboard
  • Code Defender
    • Code Defender Introduction
    • Getting Started with Code Defender
    • Code Defender Glossary
      • Overview
        • Dashboard
        • Audits
        • Host Domain / Application View
        • Incidents Classification Workflow
        • Analyzer
        • Reports
    • Website Risk Analyzer
  • Platform
    • Account settings
    • Manage users
    • Role permissions
    • Enforcer configurations
    • Page Type Mapping
  • Client-Side Integration
    • JavaScript tag
    • Improving first page performance
    • Use of cookies & web storage
    • Advanced client integration
LogoLogo
Login
Login
HUMAN DashboardHUMAN WebsiteRequest a Demo
On this page
  • Workflow
  • 1. Move an Incident to Under Review
  • 2. Add an incident to an allow or deny list
Code DefenderPortalClient-side Defense

Incidents Classification Workflow

Was this page helpful?
Previous

Analyzer

Next
Built with

Incidents can go through several phases:

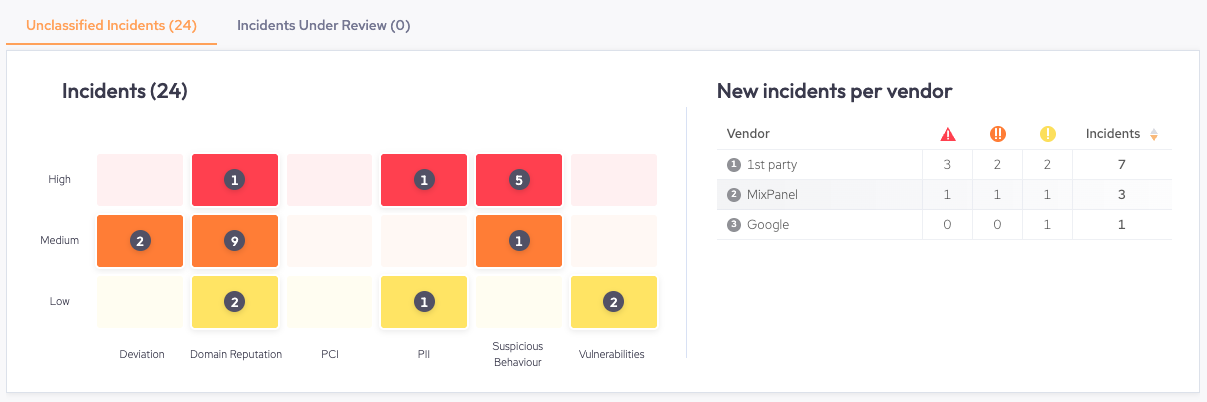
  • Unclassified: These appear in the Unclassified Incidents tab. The initial state of each new incident. The incident is considered unclassified until it’s moved to Under Review or added to either the Allow list or Deny list.
  • Under Review: These appear in the Incidents Under Review tab. This is an optional state where the incident can be marked for further inspection to better assess whether its behavior is either:
    1. Should be allowed and added to the Allow List, or
    2. Should be prevented and added to the Deny list
  • Classified: The incident has been added to either the Allow List or Deny List and is no longer shown on the Dashboard.

Workflow

1. Move an Incident to Under Review

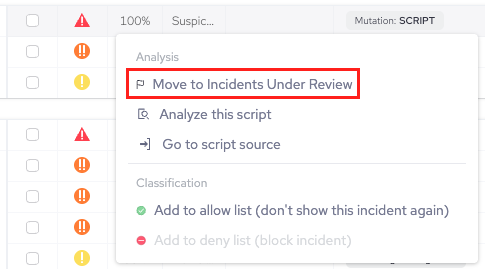
When a script’s behavior should be verified by a specific individual or team, you should click the relevant incident and choose Move to Incidents under review:

This opens the Move to Incidents Under Review window. From here, you can:

  • Create and add labels to the incident
  • Create a Jira ticket from the incident
  • Send a Slack message of the incident
  • Send an email of the incident
  • Create a custom integration

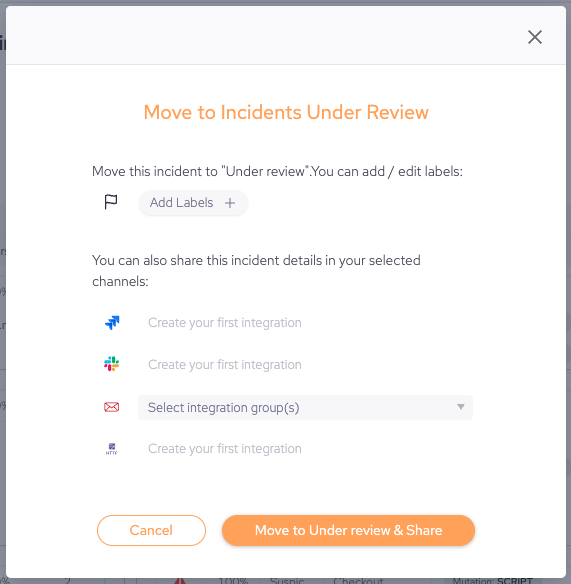
Once you’re done, click Move to Under review & share. This updates the incident and moves it to the Incidents Under Review tab. After your team inspects the incident and there’s a better understanding of the specific script’s behavior, you can safely allow or deny the incident.

2. Add an incident to an allow or deny list

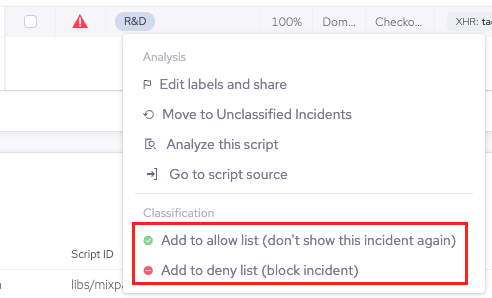
When a script’s behavior is known and you want to either allow or deny it, then you can:

  1. Click the relevant incident
  2. Choose either Add to allow list (don’t show this incident again) or Add to deny list (block incident).

Upon approval, the actions corresponding to the denied incident will be added to Policies > Allow List or Policies > Deny List depending on your selection.