Precheck settings
Precheck is a Bot Defender validation that appears when HUMAN detects a new bot visiting your application for the first time. Because these bots have never visited your site, Bot Defender has no information about them. However, if the bot is malicious, you want to protect your site even on its first visit (such as protecting against scraping). Precheck tests these bots before they act. If the bot fails Precheck, then it can't proceed to your site.
You can enable and customize how Precheck behaves and looks from BD settings.
Prerequisites
- Your Sensor version must be at least 8.9.3 or higher. See our installation instructions to learn how to update to the latest version.
- Your application must be in production mode.
Enable Precheck
- Navigate to Bot Defender > Settings > Precheck Settings.
- Select the application you want to enable Precheck on from the Application name & Application ID dropdown menu.
- Select the Precheck Configuration tab.
- Turn on Precheck Enablement.
- Click the checkbox if you want to receive daily reports in your email. Otherwise, you can always return to this page to download the daily report manually.
- Click Save Changes.
- Click Save.
Precheck appears to first-time visitors on their first request on your application’s sensitive routes.
Customize Precheck implementation
Once you enable Precheck, you can manage how it works on your site.
Add exclusions
By default, Bot Defender embeds Precheck on pages that are most susceptible to scraping attempts. However, you can exclude Precheck on certain routes on your application using regular expressions (regex).
- Navigate to Bot Defender > Settings > Precheck Settings.
- Select the application you want to enable Precheck on from the Application name & Application ID dropdown menu.
- Select the Precheck Configuration tab.
- Click Add Exclusion.
- Enter the regex pattern for the path(s) you want to exclude.
- Click Validate Route. Precheck will confirm your regex matches at least one path in your application. Once it does, it will display these paths and the total number of matching paths.
- To confirm the paths that appear are correct, click Apply.
- To add more exclusions, repeat Steps 2-5.
- Click Save Changes.
- Click Save.
Manage exclusions
Once you’ve added one or more exclusions, they’ll appear in your Precheck Exclusion Settings. You can manage each exclusion with the following options:
- Click the checkbox next to any exclusion to either enable or disable Precheck on matching routes.
- Hover over and click remove to permanently delete the route.
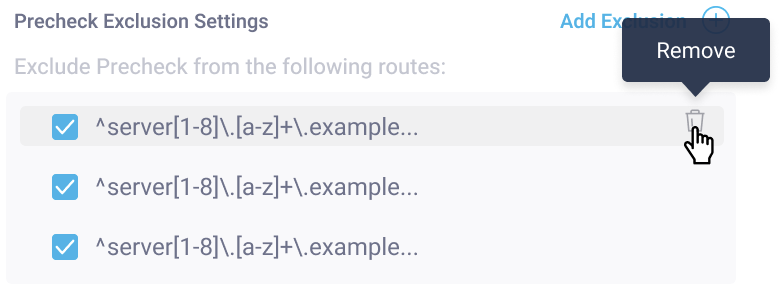
Be sure to click Save changes to apply your updates.
Export Precheck reports
In addition to receiving Precheck reports daily to your email, you can also download reports from Precheck Settings.
Note
Precheck reports are updated daily. Be sure to download a given day’s report before it’s replaced the next day.
If you download a report the same day you enable Precheck, then the report will have projected Precheck impact data. This is because Precheck hasn't been active for a long enough time on your application. We recommend waiting a full day after enabling Precheck to download reports with actual impact data.
To download a report:
- Navigate to Bot Defender > Settings > Precheck Settings.
- Select the application you want to download the report from in the Application name & Application ID dropdown menu.
- Select the Precheck Configuration tab.
- Click the
 button to export your report.
Updated about 10 hours ago