- Prerequisites
- Investigate single ATO incidents
- 1. Browse for incidents
- 2. Review the incident
- 3. Get detailed incident activity information
- 4. Compare incident activity to the account’s baseline
- 5. Resolve the incident
- Investigate network ATO incidents
- 1. Find the affected network
- 2. Learn what triggered the incident
- 3. Evaluate the connections between accounts
- Networks with multiple VIDs
- Networks with a single identifier
- 4. Get detailed incident and account information
- 5. Resolve the incident
Investigate Account Takeover incidents
Account Takeover (ATO) incidents refer to attacks where bad actors attempt to log in to and use a legitimate user’s account to access sensitive information or assets. Whenever HUMAN Sightline mitigates ATO, it’ll record them in the Recent Attacks dashboard as either single events or network events. Single events are isolated incidents, while network events are unique HUMAN detection events where Sightline detected shared identifiers across multiple compromised accounts that indicated these incidents originated from the same attacker or group or attackers. Once these incidents are recorded, you can investigate each one to learn more about how Sightline mitigated this incident, what suspicious activities occurred, and ultimately resolve the incident.
While each process will be different depending on the incident and your organization’s needs, you can follow the steps in this article to start investigating single or network ATO incidents. See Investigate Fake Accounts incidents for information on investigating FA.
You can search for any account ID from the Account Takeover investigation page regardless of whether that account was recently under attack. This means you can check any ID and see if it had an ATO incident, even if that ID does not appear in Recent Attacks.
You can also use HUMAN Insights  to generate AI insights about your incidents as well. Note that Insights are still experimental.
Prerequisites
- Configured Policy Rules to mitigate incidents.
- The incident’s Account ID to search for and start investigating it.
Investigate single ATO incidents
Single ATO incidents refer to isolated takeover attempts on legitimate accounts by bad actors. When this occurs, it can be helpful to investigate the incident to ensure that the proper mitigation was done.
1. Browse for incidents
To get started, you need to search for an affected account or incident to investigate.
- Navigate to Sightline Cyberfraud Defense > Explore > Visitors > Recent Attacks.
- From the Account Takeover tab, find an incident to investigate. You can do this in two ways:
- Browse the list of incidents
- Search the Account ID of the specific incident you want to investigate.
- Click the incident to open its Investigation page.
2. Review the incident
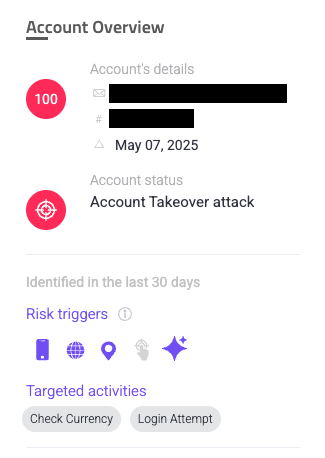
When you first start investigating an incident, it’s important to understand what risky activities and triggers caused Sightline to identify this incident as ATO.
First, we recommend reviewing the Account Overview for Risk triggers and Targeted activities. Risk triggers are an aggregation of all relevant triggers Sightline detected in the time period you’re investigating. There are five categories of risk triggers:
- Device
 : Anomalies related to the device being used by the account.
 - Network
 : Anomalies related to characteristics of the access point from where the account made a connection.
 - Location
 : Anomalies related to the location of the user based on their IP.
 - Behavior
 : Anomalies related to the behavior of the user.
 - HUMAN Model Anomaly
 : Anomalies Sightline detected with HUMAN’s behavior model, which is based on observed behaviors of legitimate users.
Sightline also provides Targeted activities, which are the tasks the attacker attempted to perform on the sensitive account-related paths that Sightline monitors. Sightline combines risk triggers, targeted activities, and overall risk score to determine how risky the behavior is before mitigating an incident. We recommend that you understand what these were as well so you can get an idea of what triggered the mitigation.
In the example below, we can see that Sightline detected a variety of risk triggers and listed common targeted activities during the incident. This gives us a general idea that an attacker from an unusual device, network, and location was behaving irregularly on paths related to currency and logins.
Next, we recommend you review the Account Activities Timeline. While the Overview helps you understand what occurred, the Timeline helps you understand when it occurred. This is important for determining a precise history of when the risky activities happened compared to legitimate behavior. Using the same incident example as above, we can see that this account had two risky activities in a short time period.
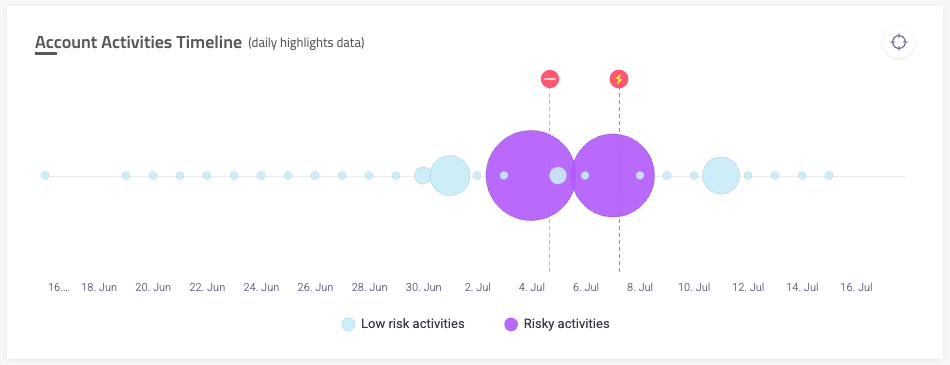
Risky activities are marked and color coded on the Timeline. You can hover over the risky activities to get a breakdown of the precise activities that occurred during that time. You can also hover over the policy rule ![]() or action
or action ![]() when they were triggered to learn which of your rules and actions were used to mitigate this incident. In our example, risky activities occurred on July 4, 2025 and July 7, 2025. Each of these days had high risk scores, which means it makes sense that Sightline mitigated and took action upon these activities based on our policy rules. We can keep these dates in mind as we get more information about the incident.
when they were triggered to learn which of your rules and actions were used to mitigate this incident. In our example, risky activities occurred on July 4, 2025 and July 7, 2025. Each of these days had high risk scores, which means it makes sense that Sightline mitigated and took action upon these activities based on our policy rules. We can keep these dates in mind as we get more information about the incident.
3. Get detailed incident activity information
The Activities Log lists out each activity taken on the account in a detailed log so you can get granular insights on each activity, including the time and date of the activity, the path the activity occurred on, the risk score, risk triggers, and more. You can edit ![]() the columns to customize the information displayed here. Be sure to take advantage of this log to find specific information about each activity you want to learn more about. If a certain column is not there and you would like to sort by that information, consider adding it as a custom parameter or contact us.
the columns to customize the information displayed here. Be sure to take advantage of this log to find specific information about each activity you want to learn more about. If a certain column is not there and you would like to sort by that information, consider adding it as a custom parameter or contact us.
4. Compare incident activity to the account’s baseline
Now that you have detailed information about what triggered Sightline’s mitigation on this incident, we recommend comparing this to the account’s baseline. An account’s baseline refers to the account’s typical observed behaviors or actions when a legitimate user is using it. If Sightline observes atypical behavior that’s also high risk, then it flags it as ATO and mitigates it. By comparing between the risky activity and the baseline, you can answer questions such as:
- Does it make sense that these risky activities were flagged as incidents?
- Was this incident correctly identified as account takeover?
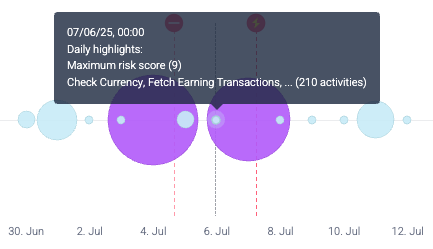
The first way you can compare risky activities to the baseline is returning to the Account Activities Timeline. Here, you can hover over Low risk activities and observe the activities Sightline usually observes on the account. Then, you can compare to the Risky activities for unusual characteristics such as the account performing different tasks than usual or frequently visiting sensitive paths over and over in a single session.
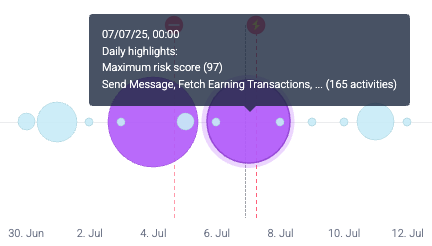
Let’s continue to consider our example incident. Below, we can observe that risky activities occurred around the same time as low risk activities. This is likely due to the legitimate user conducting low risk activities at the same time as the risky ones, supporting the idea that there was indeed an attacker attempting to take over this account. However, when hovering over the low risk activities on July 6, we see that the listed activities aren’t significantly different from the risky ones on July 7. However, their maximum risk scores are 9 and 97 respectively, so there was clearly something that triggered Sightline into mitigating the incident. We’ll need more information to determine if this was correct.
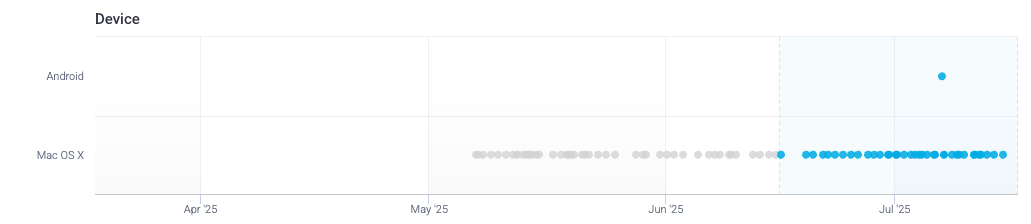
The second way is to consider the Identifiers History, which has identifiers for the account such as its device, ASN, and IP Country. Sightline tracks these over time so you can easily observe discrepancies in identifiers. That said, changes in identifiers does not automatically mean the activity is risky, and sometimes it may make sense for identifiers to occasionally change. For example, a legitimate user’s IP Country may change if they are traveling, or their Device may change if they log on to a different trusted device. It’s important that you consider all of these identifiers in combination with the risky activities in the Account Activities Timeline to resolve the incident.
For example, continuing with the same sample incident that we’ve been using, we can see that, while this account does have a specific device, ASN, and IP that it typically uses, there is a variety across all of them. However, just one difference doesn’t necessarily mean that the account has been taken over. For example, while we can easily observe that this account almost always uses Mac OS X and the single Android usage is unusual, this may just as well have been due to the legitimate account owner using an Android phone for some reason to access their account.
Similarly, while we can see this account’s ASN used to be LSHIY-USER-CONTENT, it’s changed many times and now tends to be Prime-sec. However, again, just because the ASN has changed in the first place does not necessarily mean the account has been hacked. Based on how this account’s ASN now usually seems to be Prime-sec, it’s more likely that the legitimate owner’s ASN changed. So, this may not immediately indicate that this is account takeover either.
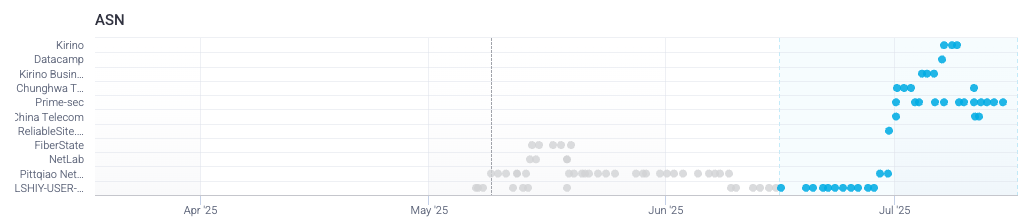
However, if we use the dates that Sightline suspects there was risky behavior and compare it across all identifiers, then we get a more complete idea of the incident. Below, we see that on July 7, the account not only was accessed from an Android device, but also from three different ASNs (Kirino, Datacamp, and Prime-sec) and three IPs (Singapore, Australia, and Hong Kong). It’s extremely unlikely that a legitimate user would access their account on the same day using three different ASNs and IPs, especially when the majority of their activity tends to be on Prime-sec and Hong Kong. Given that information in combination with the risky activity focused on sensitive routes on July 7, we can conclude that this was indeed an ATO incident.

Takeaway
Be sure to compare incident activity to the baseline across the Account Activities Timeline, Identifiers History, and, if needed, the Activities Log. It’s important that you resolve the incident based on all the data from all sources rather than just one.
5. Resolve the incident
Once you finish investigating an incident, it’s important that you resolve it so that it’s no longer pending and waiting to be looked at. You can also update the account status to a different attack type or mark it as not at attack at all. This not only updates your records, but updates HUMAN’s learning model to be more accurate on your applications.
To resolve an incident:
- Click Update account status.
- Click the Account status you want to update the account as, or leave it at Account Takeover.
- Add a note with any additional information, observations, or justification for your update.
- Click Update & Resolve.
You can also resolve accounts that Sightline did not detect an incident on by searching for the account’s ID and similarly updating its account status from No Attack to the attack type of your choice.
When you resolve the account, Sightline will add a new log entry to the Activities Log and move it to the Pending section in Recent Attack’s Account Takeover tab.
Investigate network ATO incidents
Network ATO incidents refer to incidents where multiple compromised accounts shared identifiers, including accounts that may have looked legitimate on their own. These identifiers led Sightline to believe that all these accounts were part of a single attack campaign from the same attacker or group of attackers. Investigating these compromised accounts as a single network rather than many seemingly unrelated individual attacks helps your organization make informed mitigation choices.
Sightline updates network events every 30 minutes. This adds any new accounts and removes stale ones, which are accounts Sightline has not detected in seven days.
1. Find the affected network
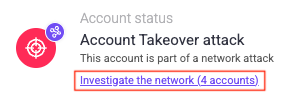
To get started, you need to first identify and search for the network event. Typically, you can identify a network attack by finding an individual account that was part of a network. You can then click Investigate the network to open the network investigation page.
However, if you already know about a network event and when it happened, you can also navigate to Sightline Cyberfraud Defense > Explore > Visitors > Recent Attacks. Then, filter by Network events to quickly find the incident you’re looking for.
2. Learn what triggered the incident
When you first start investigating an incident, it’s important to understand what risky activities caused Sightline to identify this incident as network ATO and what its identifiers are. The network’s identifiers are at the top of the Linked Accounts By Network component, which also shows the number of affected accounts. In the example below, this network event shared VIDs, ASNs, a country, an email domain, and devices across all its compromised accounts. However, these identifiers can change per network.

Based on these identifiers, we can begin to evaluate if this was indeed a network event. Based on the example above, we can likely assume that these accounts were connected in an ATO campaign. This is because some of these identifiers, while perhaps possible in isolation, become more and more unlikely to happen legitimately when considered all together. For example, while it is possible for 106 accounts to come from two different countries in isolation, it’s unlikely that all of these accounts would only share three ASNs. This indicates that the attackers likely attempted to access these accounts from those specific locations and ASNs.
Another example is that, despite there being 106 accounts, Sightline detected that only 19 devices were involved in the network’s incidents. While it’s possible for multiple accounts to come from a smaller number of devices, such as in cases like a school or office building, this number makes less sense when considering the accounts are spread out across two countries. This could indicate that attackers used a set of devices to access all the 106 accounts instead.
We also recommend you familiarize yourself with the risky behaviors Sightline detected for the network. These are indicated to the right of the network visualization and include the number of activities done per behavior. These behaviors are determined by the sensitive routes you asked Sightline to specifically monitor for account-related incidents. In the same example, this network incident focused primarily on login attempts, but had other behaviors as well.
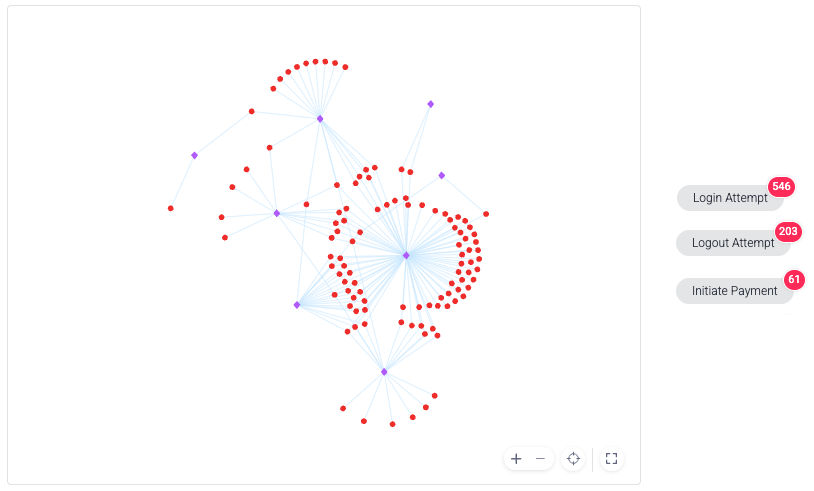
Based on the number of activities per behavior, we can also conclude that HUMAN detected this as an ATO network. This is because, across 106 accounts, there were 546 login attempts alone. If we assumed all these accounts had legitimate users, then 546 is a very high number of login attempts for the number of accounts involved. So, we can likely assume that attackers were attempting to break into these accounts instead.
Takeaway
Use a combination of the number of identifiers and risky behaviors to determine if it makes sense that this incident was flagged as a network incident.
3. Evaluate the connections between accounts
Once you have a general idea of what happened during this network attack, we recommend investigating the connections between accounts in combination with identifiers Sightline detected. Assessing these helps determine if it makes sense that Sightline flagged these accounts as part of an incident.
This evaluation can differ slightly based on the type of network event you’re investigating. Some network events may have multiple VIDs, while others may only have one VID. You can learn about evaluating either case below.
Networks with multiple VIDs
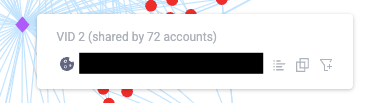
Networks with multiple VIDs show the connections between each VID and all the accounts that used them. You can hover over each account to learn which VIDs it’s connected to or over each VID to see how many accounts are related to it. An example of this is shown in the visualization below.
You can also click on a VID to open the accounts associated with it in the control panel, copy it, or filter the Activities Log by it.
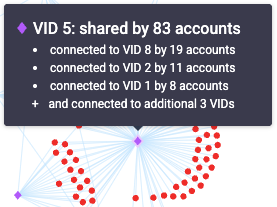
In this example, we can observe there are 106 accounts that are connected in some way or another to only eight VIDs. In particular, VID 5 is shared by 83 accounts. This alone strongly indicates that this was a case of an account takeover campaign across all these accounts, since it’s very unlikely for that many accounts to share one VID. We can observe similar connections across multiple VIDs.
Sometimes, you might see disconnected clusters of accounts and VIDs from the main network. This happens when Sightline has not observed the account that connected them to others in seven or more days. However, these are still considered part of the network and are therefore displayed in the visualization.
Networks with a single identifier
Networks with a single VID typically have accounts that share a single identifier instead. These accounts don’t show connections like in visualizations with multiple VIDs, but instead group together the accounts by identifier like in the example below. To determine whether an incident is a network event, we should evaluate if it makes sense for the accounts involved to have the shared identifiers that Sightline flagged.
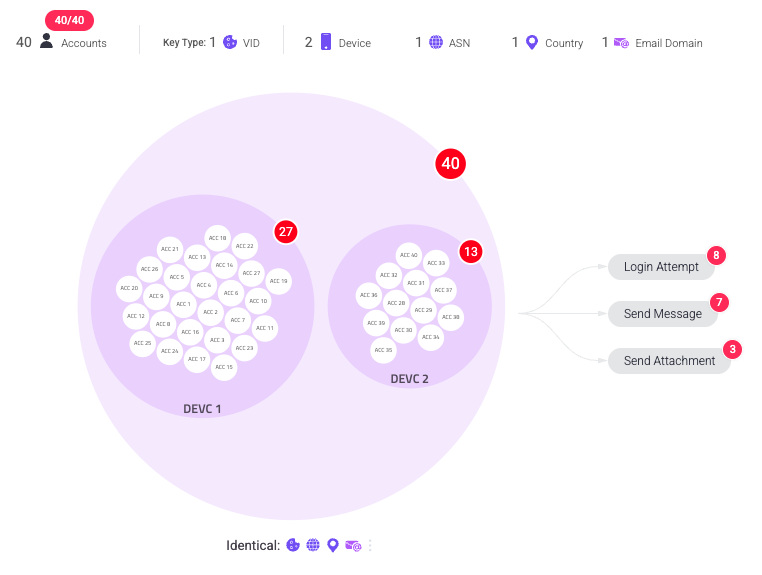
In this example, we can observe that there are 40 accounts shared by multiple identical identifiers: the VID, the ASN, the country, and the email domain. Based on the VID alone, we can likely assume that this is a case of network ATO, as it’s very unlikely for 40 accounts to have the same VID.
Additionally, we can see that these 40 accounts shared two devices, and the visualization separates the accounts into two groups representing this. Not only did these 40 accounts share an identical VID, but 27 of them came from one device and 13 from the second. We typically would not expect this for legitimate accounts, which helps us conclude that this is likely a network event.
4. Get detailed incident and account information
The Activities Log lists out each activity taken on each account in the network as a detailed log so you can get granular insights on each activity, including the time and date, the path, the risk score, risk triggers, and more. You can edit ![]() the columns to customize the information displayed here. Activities that are network-exclusive, or activities that occurred on a set of accounts in the network rather than individual ones, are highlighted in yellow so you can quickly differentiate them. Be sure to take advantage of this log to find specific information about each activity you want to learn more about. If a certain column is not there and you would like to sort by that information, consider adding it as a custom parameter or contact us.
the columns to customize the information displayed here. Activities that are network-exclusive, or activities that occurred on a set of accounts in the network rather than individual ones, are highlighted in yellow so you can quickly differentiate them. Be sure to take advantage of this log to find specific information about each activity you want to learn more about. If a certain column is not there and you would like to sort by that information, consider adding it as a custom parameter or contact us.
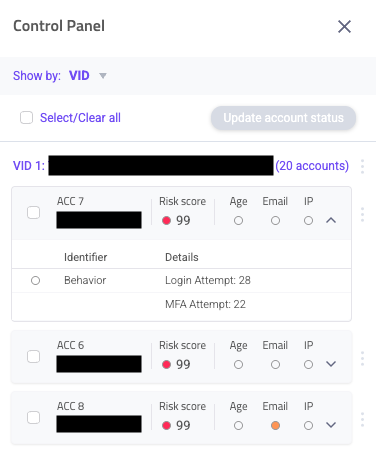
You can also use the control panel to get detailed information per account that’s involved in the network. To open it, click Open control panel from the Network Attack overview component. You can sort this list with the options in the Show by menu and toggle open each account to learn more about the risky behaviors Sightline flagged on each. This is useful for evaluating each account within the context of the network. If needed, you can also investigate or filter by each account from here as well.
5. Resolve the incident
Once you finish investigating the network, it’s important that you resolve the accounts involved in it. You can resolve network events via the control panel, which lists all accounts involved in the event. Each resolution is per account, and you can resolve an entire network event by resolving all of its accounts. You can also update the account status to a different attack type or mark it as not at attack at all. This not only updates your records, but updates HUMAN’s learning model to be more accurate on your applications.
To resolve an incident:
- Click Open control panel.
- Select each account you want to resolve, or click Select all to choose all of them at once.
- Click Update account status.
- Click the Account status you want to update the account as, or leave it at Account Takeover.
- Add a note with any additional information, observations, or justification for your update.
- Click Update & Resolve.
When you resolve the network incident, Sightline will add a new log entry to the Activities Log and move it to the Pending section in Recent Attack’s Account Takeover tab.