Install the Fastly VCL Enforcer v12
If your organization uses Fastly, you can use HUMAN's Fastly VCL Enforcer to protect against malicious behavior. The Enforcer is deployed to your content delivery network (CDN) and dictates how traffic should be handled per your organization's standards.
You can learn how to install the Fastly VCL Enforcer with this article.
Prerequisites
- A Fastly account. You can navigate to Fastly’s website to create one.
- A Fastly API token with global scope (not global:read). You can find or generate one from the Fastly dashboard > Account > Personal Profile > API tokens.
- A Fastly service created on the CDN and set up with your organization’s necessary service configurations, such as Domains and Origins. You'll configure the Fastly Enforcer on this service. You can use an existing one or create a new service from Fastly’s dashboard by selecting Create service > CDN.
- Your unique HUMAN information:
- Your Application ID. You can find this under Platform Settings > Applications > Select an application > Application Settings > Application ID in the console. If you have multiple environments, you will also have multiple Application IDs, so be sure to choose the correct ID for the environment you want to install on.
- Your Server Token. You can find this under Platform Settings > Applications > Select an application > Application Settings > Server Token.
- Your Risk Cookie Key. You can find this under Bot Defender > Policies > Policy Settings > Policy Information.
Contact Fastly and HUMAN
To install the Fastly Enforcer, you first need to do the following:
Contact Fastly
Fastly needs to activate certain functionality in your service so it works with the HUMAN Enforcer. Fastly is familiar with HUMAN and its Enforcer, so you can simply send them an email to enable it.
Note
This functionality must be manually activated by Fastly for each service you want to add the HUMAN Enforcer to, so you may need to send multiple service IDs.
- From the Fastly dashboard, select the service you want to add the Enforcer to.
- Copy the service’s ID.
- Send an email to [email protected] with the following:
- Subject: Please enable HUMAN support for our Fastly service
- Body: Please enable HUMAN support for our service ID, <YOUR_ID_HERE>, and confirm when it is completed.
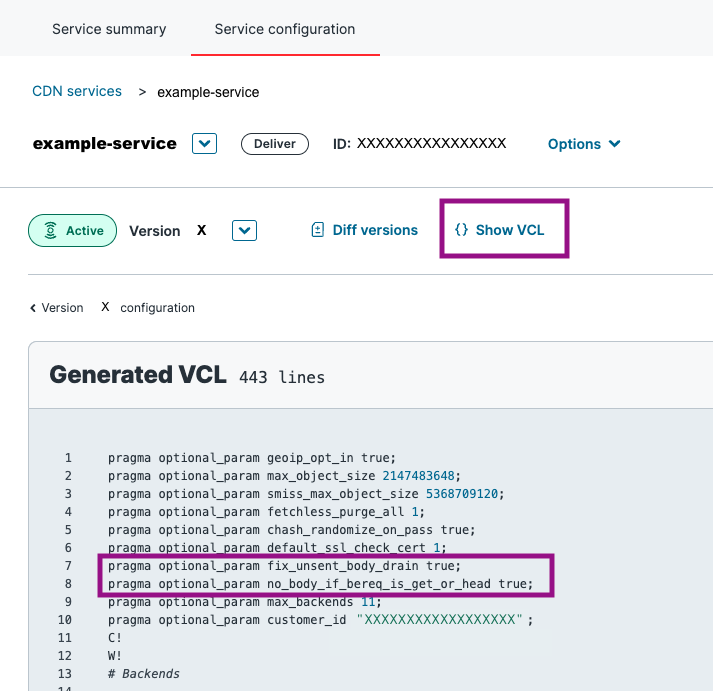
Fastly will add the following pragmas to your service:
fix_unsent_body_drain
: Used to resolve an issue with HTTP response bodies not being fully sent to the client.no_body_if_bereq_is_get_or_head
: Used to prevent a response body from being sent to the client if the request method is GET or HEAD.
You can confirm that these pragmas were added by navigating to your service’s Service configuration > Show VCL.
Contact HUMAN
After Fastly enables HUMAN support in your service, you need to contact the HUMAN team to receive the necessary VCL files and account information to complete your setup. To do so:
Note
If you’ve already received all this information, then you can skip this section.
- Email us at [email protected]. Be sure to note that you are starting a Fastly VCL Enforcer configuration.
- Ensure you receive all of the following:
- The following VCL files, which you’ll use in Upload and edit VCL files:
PX.vcl
PX_CONFIGS.vcl
PX_CUSTOM.vcl
- The following configuration values, which you’ll use while updating the configs file settings:
px_remote_config_id
px_remote_config_auth_token
- The logger authentication token, which you’ll use in Logging endpoint setup.
- The following VCL files, which you’ll use in Upload and edit VCL files:
Once you receive these, you're ready to Install the Enforcer.
Install the Enforcer
Once you’ve enabled HUMAN support via Fastly and acquired all the necessary information from HUMAN, you’re ready to start installing the Enforcer.
- Navigate to the Fastly dashboard and select the service you want to add the Enforcer to.
- Select Edit configuration > Clone. Be sure to note the version number you are editing. This will be used as the
version_id
in later on in Dictionary setup. - Complete each of the following sections in order:
Dictionary setup
The HUMAN Fastly VCL Enforcer requires you create certain dictionaries to properly compile. To create them:
- Navigate to Service configuration > Data > Dictionaries and select Create to make a new dictionary.
- Create a Fastly dictionary named
px_enforcer_config_rdata
. You do not need to add any key values; HUMAN will populate the dictionary for you.
Note
The following steps must be completed via Fastly’s API. For your convenience, you may also download our provided Postman Collection.
- Use Fastly’s Get an edge dictionary endpoint to retrieve the dictionary
id
for thepx_enforcer_config_rdata
, then save it for later on in the installation process. To make this call, you will need:- The
service_id
, which you can find at the top of your Fastly service. - The
version_id
, which is the version of the service you are currently editing. - Your Fastly API token.
- The
curl -i "https://api.fastly.com/service/<service_id>/version/<version_id>/dictionary/px_enforcer_config_rdata" \
-H 'Fastly-Key: <fastly_api_token>' \
-H 'Accept: application/json'
- Use Fastly's Create an edge dictionary endpoint to create a dictionary named
px_private
. Then, save itsid
for the next step. To make this call, you will need:- The
service_id
, which you can find at the top of your Fastly service. - The
version_id
, which is the version of the service you are currently editing. - Your Fastly API token.
- The
curl -i -X POST https://api.fastly.com/service/<service_id>/version/<version_id>/dictionary \
-H 'Fastly-Key: <fastly_api_token>' \
-H "Content-Type: application/x-www-form-urlencoded" \
-H "Accept: application/json" \
-d 'name=px_private&write_only=true'
- Use Fastly's Create an entry in edge dictionary endpoint to create an item key named
px_fastly_api_token
and with its item value as your Fastly API token.- The
service_id
, which you can find at the top of your Fastly service. - The
dictionary_id
, which is theid
of thepx_private
dictionary you created in Step 4. - Your Fastly API token, which you’ll use to make the call and as the dictionary item value.
- The
Note
Because
px_private
is a private Fastly dictionary, the item key and value pair may not appear in your Fastly service GUI, even after you’ve successfully created it via API call.
curl -i -X POST "https://api.fastly.com/service/<service_id>/dictionary/<dictionary_id>/item" \
-H 'Fastly-Key: <fastly_api_token>' \
-H "Content-Type: application/x-www-form-urlencoded" \
-H "Accept: application/json" \
-d 'item_key=px_fastly_api_token&item_value=<fastly_api_token>'
Next, you're ready to move on to Upload and edit VCL files.
Upload and edit VCL files
The HUMAN Fastly VCL Enforcer consists of three custom VCL files that need to be uploaded to your service. These define the logic, configurations, and desired customizations for the VCL Enforcer. You can find a summary of all the files in the following table.
Note
If you don't have these files, see Contact HUMAN.
Provided file | VCL file name | Explanation |
---|---|---|
PX.vcl | PX | Contains all the internal HUMAN core logic. This file should never be modified. |
PX_CONFIGS.vcl | PX_CONFIGS | Contains the enforcer configuration table and additional backend configs. This file must be modified. See Configs file settings for more information. |
PX_CUSTOM.vcl | PX_CUSTOM | Contains the enforcer custom code, defined custom behavior and enforcer features. This file may be modified. See Custom file settings for more information. |
Each file must be uploaded to your Fastly service. Follow the respective section to learn how to upload each file.
PX file settings
To create the PX
file in your Fastly service:
Warning
Do not make changes to the
PX.vcl
file
- Navigate to Service configuration > Custom VCL and select Upload a new VCL file.
- Enter
PX
for the Name of the file. - In Config file, select Upload file and select the provided
PX.vcl
file from HUMAN. - Select Create.
Your PX
file should be created. Next, be sure to create a configs file.
Configs file settings
To create the PX_CONFIGS
file in your Fastly service:
- Navigate to Service configuration > Custom VCL and select Upload a new VCL file.
- Enter
PX_CONFIGS
for the Name of the file. - In Config file, select Upload file and select the provided
PX_CONFIGS.vcl
file from HUMAN. - Select Create.
- If you are redirected to your VCL file list, select the edit button next to your
PX_CONFIGS
file. - In the Edit VCL field, set the following configurations shown below.
table px_configs {
"px_app_id": "<APP_ID>", # see prerequisites
"px_cookie_secret": "<COOKIE_SECRET>", # see prerequisites
"px_auth_token": "<AUTH_TOKEN>", # see prerequisites
"px_remote_config_id": "<REMOTE_CONFIG_ID>", # see contact human
"px_remote_config_auth_token": "<REMOTE_CONFIG_AUTH_TOKEN>", # see contact human
"px_enforcer_config_rdata_id": "<REMOTE_CONFIG_DICTIONARY_ID>" # see remote configuration setup
}
- Additionally, update the
.host
value with your Application ID, as shown below.
backend PX_API {
# ...
.host = "sapi-<PX_APP_ID>.perimeterx.net"; # see prerequisites
# ...
}
- Select Update.
Your PX_CONFIGS
file should be created. Next, see Custom file settings.
Custom file settings
To create PX_CUSTOM
in your Fastly service:
Note
You do not need to add any custom configurations for the Enforcer to function, but we recommend you upload the
px_custom.vcl
file regardless so you can return to make changes later.
- Navigate to Service configuration > Custom VCL and select Upload a new VCL file.
- Enter
PX_CUSTOM
for the Name of the file. - In Config file, select Upload file and select the provided
PX_CUSTOM.vcl
file from HUMAN. - Select Create.
- If you are redirected to your VCL file list, select the edit button next to your
PX_CUSTOM
file. - In the Edit VCL field, customize your Enforcer configuration as desired. You can reference all available Fastly configurations in our help article.
- Select Update.
Your PX_CUSTOM
files should be created.
Now that you have uploaded all the files provided by HUMAN, you must now update the MAIN file settings.
MAIN file settings
There is no single entry point for VCL code. Instead, Fastly exposes a number of different subroutines that function as "hooks" during the various stages of the VCL request lifecycle. These specific subroutines such as vcl_recv
or vcl_deliver
must be defined in a special custom VCL file known as the MAIN file. Typically, Fastly automatically creates a MAIN file when you create a new service. To integrate the HUMAN Enforcer into the MAIN file, we must invoke the appropriate HUMAN subroutine in every VCL hook subroutine.
VCL hook subroutine | HUMAN Enforcer subroutine |
---|---|
vcl_recv | px_recv, px_recv_clustering_fixup |
vcl_hash | - |
vcl_hit | - |
vcl_miss | px_miss |
vcl_pass | px_pass |
vcl_fetch | px_fetch |
vcl_deliver | px_deliver |
vcl_error | px_error |
vcl_log | px_log |
You will need to edit the existing MAIN file or create a new one with all the HUMAN Enforcer subroutines to your existing VCL hooks, which are listed below. While adding these subroutines, keep in mind that:
- The HUMAN subroutines should be called as early as possible in the defined hook. This is because the subroutines use request headers and return statements to switch between different Fastly states and apply HUMAN enforcement logic only when necessary. Additionally, calling the enforcement flow in the very beginning helps avoid invoking business logic unnecessarily.
- The HUMAN subroutines should always be called before the Fastly macro.
Warning
The
px_recv_clustering_fixup
subroutine is the only exception for the above.px_recv_clustering_fixup
should be called immediately after the#FASTLY recv
macro rather than before.
To update your MAIN file:
- Navigate to Service configuration > Custom VCL.
- Edit your MAIN file or create a new one.
- If you do have an existing MAIN file, select edit button next to it.
- If you don’t have an existing MAIN file, copy the available template from Fastly, select Upload a new VCL file, enter MAIN for its name, and paste the template you copied into Edit VCL.
- In the Edit VCL field, update each VCL subroutine with the corresponding HUMAN subroutine from below.
sub vcl_recv {
call px_recv;
# ...
#FASTLY recv
call px_recv_clustering_fixup;
# ...
}
sub vcl_miss {
call px_miss;
# ...
#FASTLY miss
# ...
}
sub vcl_pass {
call px_pass;
# ...
#FASTLY pass
# ...
}
sub vcl_fetch {
call px_fetch;
# ...
#FASTLY fetch
# ...
}
sub vcl_error {
call px_error;
# ...
#FASTLY error
# ...
}
sub vcl_deliver {
call px_deliver;
# ...
#FASTLY deliver
# ...
}
sub vcl_log {
call px_log;
# ...
#FASTLY log
# ...
}
- Update your existing MAIN file or create the one you just made.
- If you’re updating your existing MAIN file, select Update.
- If you’re creating a new MAIN file from Fastly’s template, select Create. Then, after you’re redirected to your VCL files list, select Set as main next to your new MAIN file.
Next, you're ready to move on to Logging endpoint setup.
Logging endpoint setup
HUMAN uses your Fastly service’s logging to keep track of the Enforcer’s performance and activity. As part of the installation process, you will create three new HTTPS endpoints:
- PX-Async-Activities: Sends asynchronous activities, such as
page_requested
orblock
, to HUMAN's servers. - PX-Telemetry: Enables the telemetry feature, which can send on-demand data about the Enforcer configuration to HUMAN.
- HS-Log: Sends Enforcer logs to HUMAN.
Note
HS-Log uses a logger authentication token that must be provided by HUMAN. If you do not have it, see Contact HUMAN.
To create the required logging endpoints:
- Navigate to Service configuration > Logging.
- On the HTTPS logging provider, select Create endpoint.
- Create each endpoint with its corresponding fields as shown. If a Fastly field is not listed below, then you can use the default value or leave it blank.
- PX-Async-Activities
- Name: PX-Async-Activities
- Placement: None
- URL:
https://collector-<px_app_id>.perimeterx.net/api/v1/collector/s2s
- Maximum bytes: 500000
- Advanced options:
- Content type: application/json
- JSON log entry format: Array of JSON
- PX-Telemetry
- Name: PX-Telemetry
- Placement: None
- URL:
https://collector-<px_app_id>.perimeterx.net/api/v2/risk/telemetry
- Maximum Logs: 1
- Advanced options:
- Content type: application/json
- HS-Log
- Name: HS-Log
- Placement: None
- URL:
https://sapi-<APP_ID>.perimeterx.net/enforcer-logs/
- Maximum Logs: 1
- Advanced options:
- Content type: application/json
- Custom Header Name: Authorization
- Custom Header Value: Bearer <LOGGER_AUTH_TOKEN>
- JSON log entry format: Array of JSON
- Select a log line format: Blank
- PX-Async-Activities
Next, you can configure some optional settings:
Otherwise, you can move on to Wrap up.
Optional logging endpoints
You can also add logging endpoints that receive messages from the Enforcer about the Fastly request flow. The Enforcer can send two types of logs depending on the configured px_logger_severity
: debug and error.
To receive Enforcer logs:
- Navigate to Service configuration > Custom VCL.
- Select Edit next to your
PX_CONFIG
file. - Update
px_logger_severity
to the desired logging level. - Navigate to Service configuration > Logging.
- On the HTTPS logging provider, select create endpoint.
- Create a new endpoint named either
PX-Debug
orPX-Error
depending on your desired endpoint. - Configure where you want the logs to go (e.g. URL). Other settings can stay as the default values.
Note
If you need to turn on Enforcer logs temporarily and you don't have an existing logging endpoint where you can easily view the logs, Fastly's online log viewer may provide a quick solution.
Next, depending on your Fastly service, you may need to configure the following:
Otherwise, you can move on to Wrap up.
Optional Fastly shielding functionality
The px_shield
VCL snippet is required for Fastly Shielding functionality to stay enabled after a restart triggered by the Enforcer. You can learn more about Fastly’s shielding functionality with their help article.
To create px_shield
:
- Navigate to Service configuration > VCL snippets.
- Select Create a new VCL snippet.
- Create a snippet with the following settings:
- Name: px_shield
- Type: within subroutine - recv (vcl_recv)
- VCL:
set var.fastly_req_do_shield = (req.restarts == 0 || (req.restarts == 1 && req.http.px-tmp:internal-flow == "1"));
- Advanced option
- Priority: 1
Next, you may need to configure an Optional WAF prefetch condition. If you don’t, you can move on to Wrap up.
Optional WAF prefetch condition
If you are using Fastly WAF, we recommend adding condition to your Fastly service to address a potential issue that may arise from running WAF rules multiple times. This condition will effectively prevent the duplication of WAF activations and ensure a smoother operation of the integration for customers who have enabled Fastly WAF but have not implemented the WAF prefetch condition.
Note
This step is not applicable if using Fastly Next-Gen (Signal Sciences) WAF. If you are using Fastly Next-Gen (Signal Sciences) WAF, reach out to your HUMAN Solution Architect.
To add this condition to your service, you must use the Fastly API. The condition should be made with the following settings:
- Name: PX-Waf-Prefetch-Condition
- Type: prefetch
- Apply If:
req.backend.is_origin && !req.http.bypasswaf
- Priority: 10
curl -i -X POST "https://api.fastly.com/service/<service_id>/version/<version_id>/condition" \
-H "Fastly-Key: <fastly_api_token>" \
-H "Content-Type: application/x-www-form-urlencoded" \
-H "Accept: application/json" \
-d "name=PX-Waf-Prefetch-Condition&statement=req.backend.is_origin+%26%26+%21req.http.bypasswaf&type=PREFETCH&priority=10"
Next, you're ready for Wrap up.
Wrap up
If you’ve completed your Enforcer installation, you must have the following in your Fastly service:
- In Service configuration > Data > Dictionaries, a dictionary named
px_enforcer_config_rdata
- A private dictionary,
px_private
, with a key namedpx_fastly_api_token
- In Service configuration > Custom VCL, four VCL files:
MAIN
, which must have the necessary HUMAN subroutinesPX
, which must not have any changes to itPX_CONFIGS
, which must be updated with your unique valuesPX_CUSTOM
, which may have custom configurations as desired for your organization
- In Service configuration > Logging, three logging endpoints:
PX-Async-Activities
PX-Telemetry
HS-Log
You may also have:
- In Service configuration > Logging, two optional logging endpoints:
PX-Debug
PX-Error
- In Service configuration > Snippets, a snippet named px_shield
- In Service configurations > Condition, a condition named PX-Waf-Prefetch-Condition
If you have all of these items, then you’re ready to deploy your Fastly VCL Enforcer. From your Fastly service, select Activate. This will launch the Enforcer.
Once you finish installing, be sure to contact HUMAN to complete your Tuning process.
Updated 6 days ago